Integrel Solutions - New Hardware and Firmware

In a previous blog post (read more here) I wrote about the power generation and storage capabilities of Away To Me.
In that post, I mentioned Integrel, but didn't go into any details. In this post, I'm going to dig in further on the Integrel Solutions high output alternators, and the recent updates they have made to their hardware and firmware.
Disclaimer
We aren't sponsored by Integrel, we purchased the equipment and paid to have it installed. However, because of my technical background in embedded systems and debugging, we were selected to participate in the beta program for new hardware and software/firmware. In order to test the new stuff, I did receive a free upgrade to 3 pieces of the hardware - we received a new 2nd generation touchscreen display, and we received 2 new 2nd generation controllers, one each for the port and starboard sides. Otherwise, the remainder of the system is the same as was originally installed.
Integrel provided no input to and had no editorial control over the contents of this blog post; they did ask that I wait until they made the final public release of everything, which is reasonable and I gladly agreed to do. Their release announcement can be found here.
I will likely continue to participate in the beta program, partly because I enjoy tinkering with electronics, and partly because it means that I get to help ensure that the product continues to improve for us (and for others).
Definitions
I will continue to use industry standard terms and abbreviations from the previous article. In addition, this article uses the following abbreviations:
- OEG - Integrel calls their alternator an On Engine Generator (OEG).
- N2K - NMEA 2000, this is the relatively new standard for marine instrument networks. It is used to get data from things (like wind and depth instruments) to other things (like chart plotters and multi-function displays).
- STng - the SeaTalk next generation network is Raymarine's version of N2K. It uses the same data protocol, but has different cables and connectors. It is possible to use adapter cables to convert STng to N2K, and vice versa.
- FW - firmware is software that is designed to run on devices that are more constrained than a typical computer or laptop. These days, the lines between firmware and software are more and more blurred as these constrained devices have more and more resources, but I still use FW to describe this kind of software.
- BMS - Battery Management System. Lithium batteries generally have a small computer that monitors and controls things (temperature, voltage, etc). It's part of what makes lithium batteries safe to use.
Integrel Overview
If you enjoy looking at system schematics, then this image is for you! If not...well, avert your eyes, skip ahead to the next section, and we'll just pretend that this never happened.
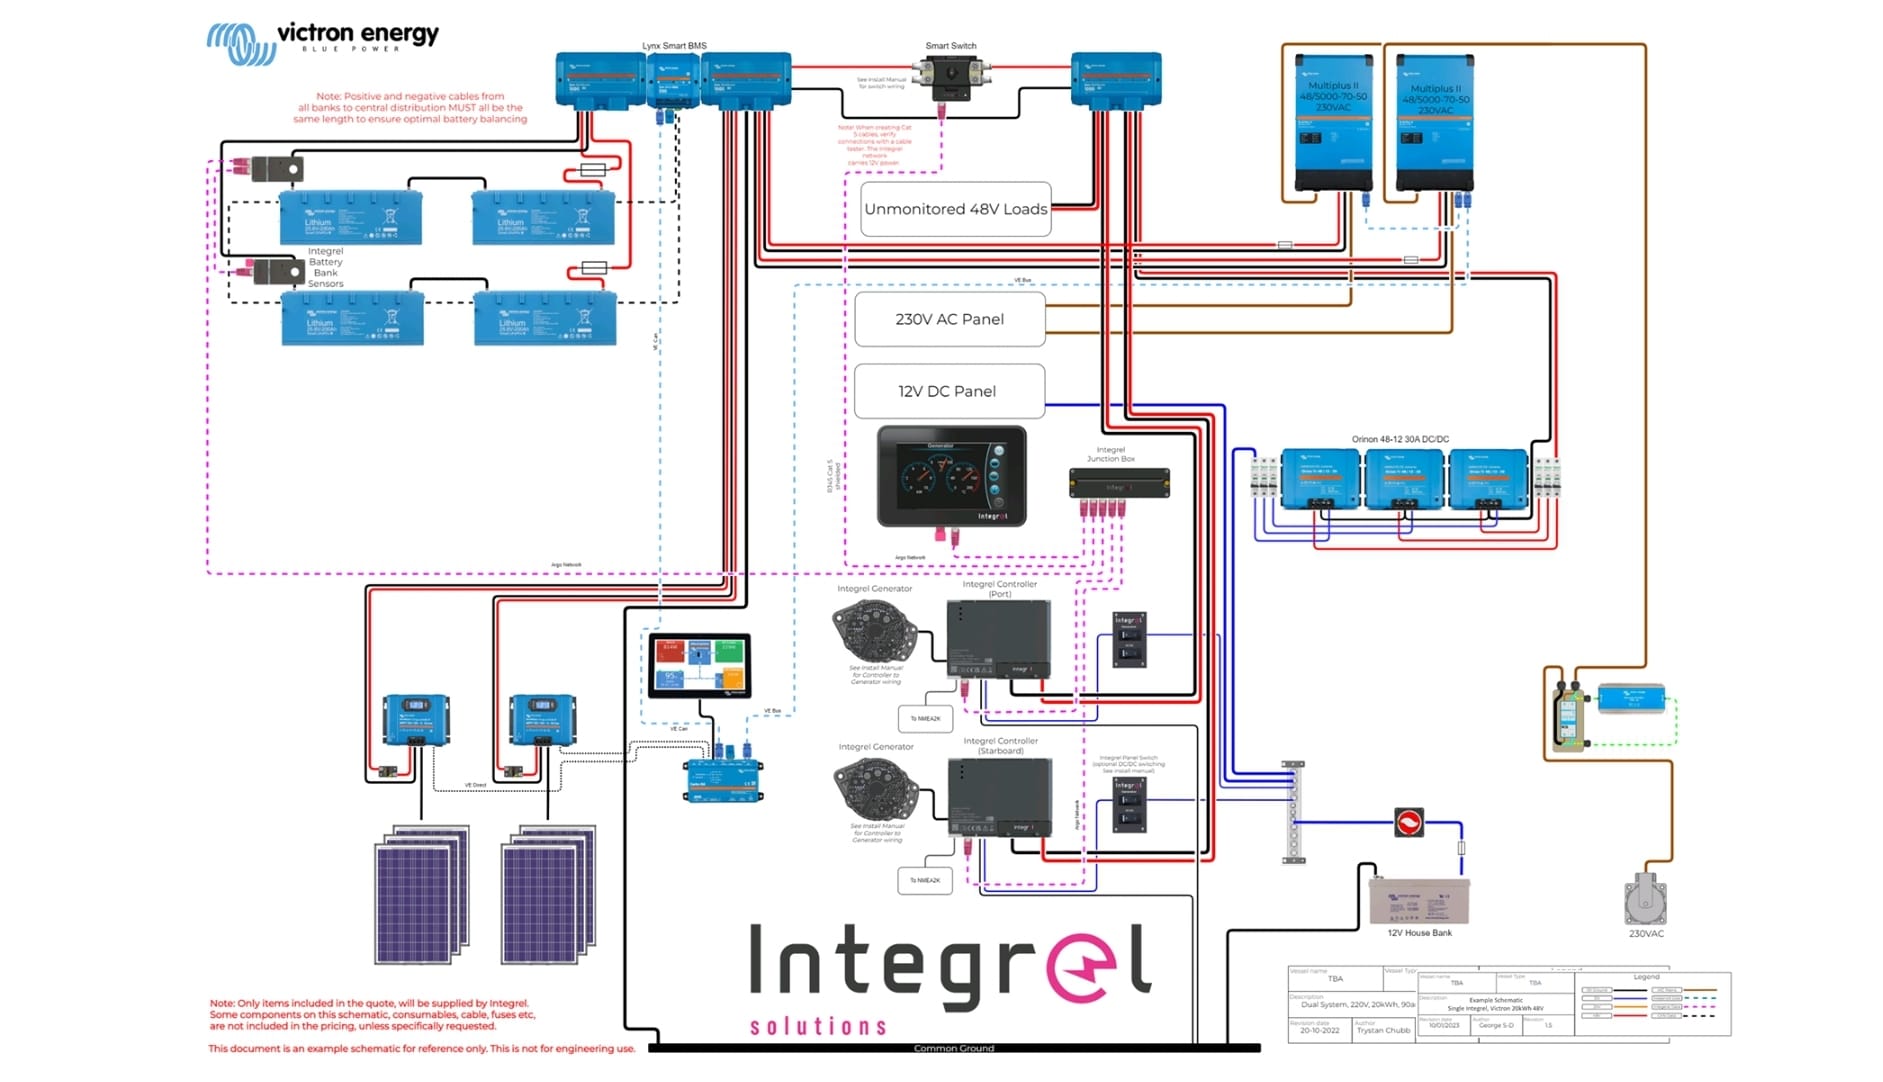
This is what Integrel recommends for the overall power system for a boat that's based on Victron Energy products, including Victron LiFePO4 batteries. Our system is similar to this - though we have more solar panels and more batteries, but it gives a decent sense for the complexity and scale of things.
A general overview of this diagram:
- In the upper left are the 48V batteries, along with Integrel sensors to measure the power going into and out of the batteries.
- Top center is a set of Victron Distributors, which allow other things to pull power out of and push power into the batteries. It's like an intelligent bus bar for power and ground. In the top middle is a black box from Integrel that is a smart relay which can disconnect the Integrel system from the batteries if a problem is detected.
- Top right is the set of Victron inverters, which pull 48V DC power out of the batteries and produce 110V AC power for the boat. They also receive 110V power from outside the boat (e.g. shore power from a marina), sending that to the 110V system in the boat and charging the 48V batteries.
- Lower right is the shore power connection for use in marinas, and just left of that is the 12V battery bank (we still need 12V in order to run the 12V DC systems on the boat).
- Middle right is the DC-to-DC charger, which takes DC power from the 48V batteries and uses it to charge the 12V batteries. We also use the OEM alternators on the engines to charge these 12V batteries.
- Bottom left is the solar panels and MPPT charge controllers. These connect to the Victron distributor to charge the 48V batteries.
- To the right of this is the Victron Cerbo, which provides a touchscreen interface to the Victron system.
- Bottom center is the Integrel OEGs and controllers. These take power from the engines, providing power to charge the 48V batteries.
- Finally, in the middle of the image we have the Integrel touchscreen and the junction box that provides a communication network for the Integrel components (which is separate from the N2K network).
Integrel vs Diesel Generator - Benefits
In the previous article, I mentioned that our setup is much better than a generator would be. This is confirmed by comparing our experience to that of many of our friends with generators.
But why should this be the case? And does this necessarily need to be the case?
Power Production
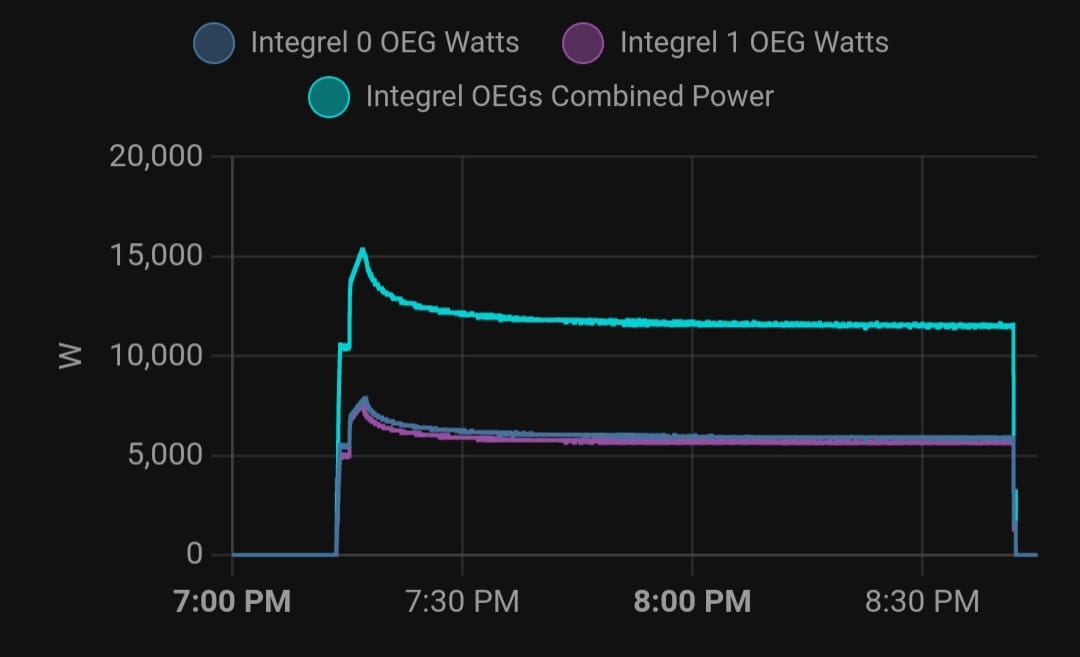
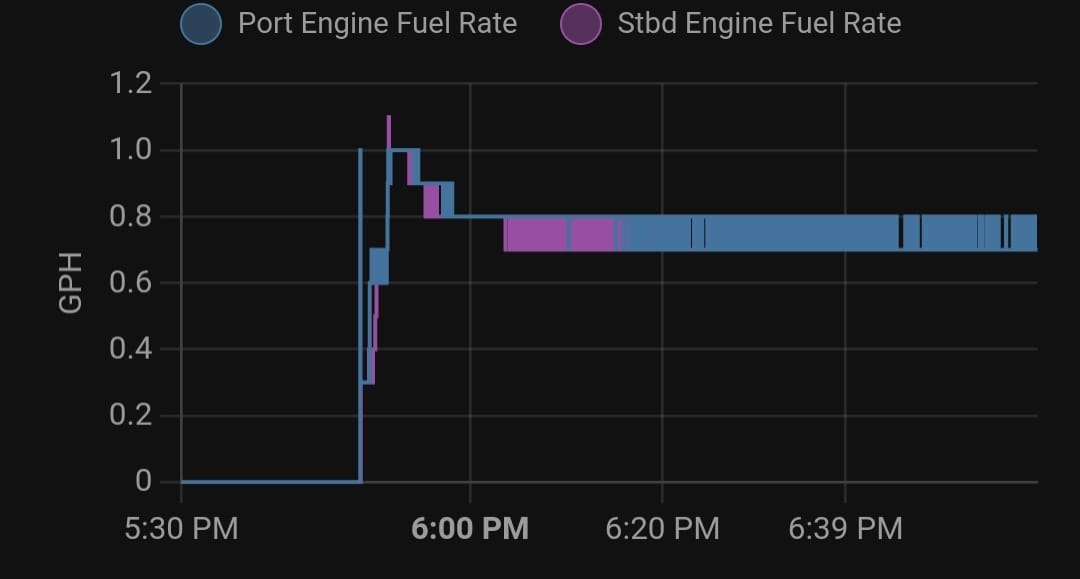
Each Integrel OEG is capable of producing up to 9kW of power under ideal conditions. In reality, we typically get between 5.8kW and 7.5kW, depending how hot things get.
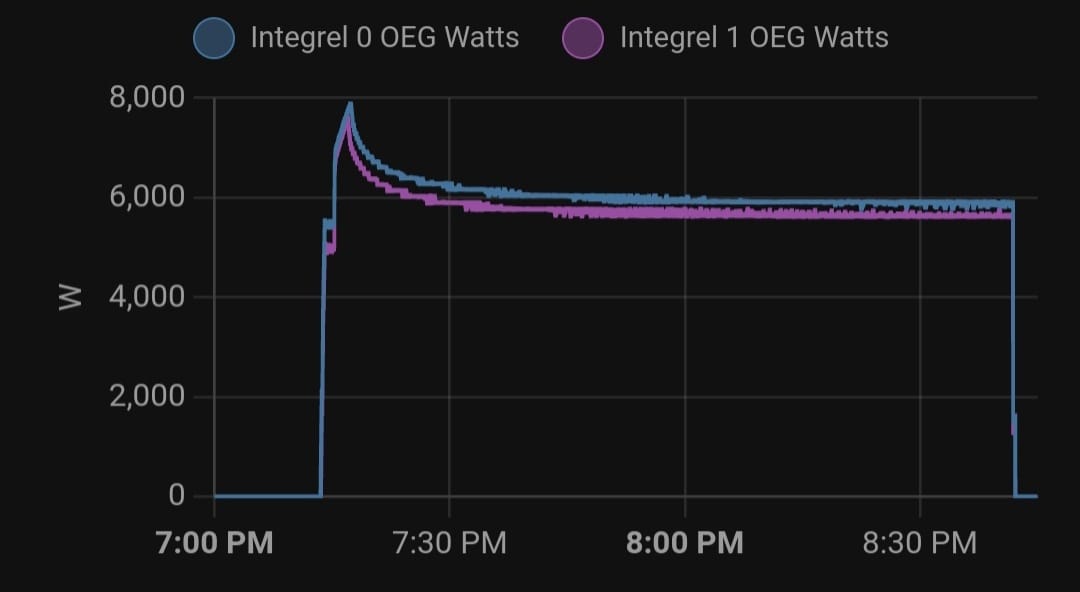
As the OEG gets warmer, algorithms implemented in the controller FW cause power generation to back off, keeping the OEG from overheating. In the above graph, you can see that power generation starts off around 5-6kW initially while the engines are warming up at 1000 RPM, then it spikes up to about 7.5-8kW briefly as I increase the throttle to 1800 RPM. Then, as the OEGs warm up, power production tapers off until it reaches a steady state.
With 2 engines and 2 OEGs, we typically produce 12-15kW of combined power.
The diesel generator that comes from Leopard as the factory option is 9kW at full throttle, but it regulates itself so that it only produces as much power as needed by the system. From discussions with friends, it seems like 3.5-7kW is fairly typical.
This means that our 2x Integrel OEGs can produce at least 33% more power than the diesel generator can at max throttle, and 1x Integrel OEG can produce about as much power as the diesel generator does under typical load.
DC Charging
The factory diesel generator produces AC power at 110V (or 220V if you have a European model boat). This power is used to run the house loads, and then any left over power can be used to charge the batteries. This can be as little as 2-3kW, depending on what house loads are running and the capabilities of the inverter/charger (which has to take the AC power and convert it to DC power for battery charging). Typical inverter chargers have a limit of 3kW to 5kW of battery charging, far below the capacity of the diesel generator.
The Integrel OEGs, on the other hand, directly charge the house batteries with DC power. The charging capacity is limited only by the batteries. As shown in the next section, we can see that the batteries don't impose any limit here.
48V vs 12V
Integrel requires the use of a 48V battery system. The key benefit to this is that the charging rate is 4x higher than an equivalent 12V system.
With a 12V system, many batteries are limited to 200A max charging rate, with a recommended charge current of 100A. 200A * 12V = 2.4kW, 100A * 12V = 1.2kW. With 3 12V batteries in parallel, this gives you a max charge of 7.2kW and recommended charge of 3.6kW. The charge rate tends to be limited by the inverter/charger, but you can see that the batteries can't max out the diesel generator.
Our 48V batteries have a maximum charge current of 400A, with a recommended current of 100A. 400A * 48V = 19.2kW, 100A * 48V = 4.8kW. With 3 of these in parallel, we can take a max charge of 57.6kW and recommended charge of 14.4kW. We can max out the charging capacity of both Integrel OEGs and still have plenty of charging capacity in the batteries.
Redundancy
With the typical diesel generator, if it has issues, you lose the ability to generate power.
Because Away To Me is a catamaran with 2 engines, even if one has issues, we can still generate power from the other one (obviously with half of the charging rate).
Fuel Consumption
At full throttle, the factory diesel generator uses about 0.9 gallons per hour. It rarely runs at full throttle due to other limitations, so typical usage is quite a bit less.
We normally run our propulsion engines at 1800 RPM when using the Integrel OEGs to charge the batteries. Initially, they will use about 0.9 gallons per hour each until thermal throttling kicks in, at which point this drops down to around 0.6 to 0.7 gallons per hour each.
Clearly, we do use more fuel than the diesel generator would, while generating more power. But, this is offset by reduced charging time.
Charge Time
As noted above, we use more fuel per hour.
But, we run less hours, so the total fuel usage is much less (* see below).
In order to add 9kWh of charge to 12V batteries with a 3kW inverter/charger, it's necessary to run the diesel generator more than 3 hours (due to AC->DC conversion losses). While running, the generator will tend to run around 50% load, so 0.45 gallons per hour. This uses around 1.3 gallons of fuel just for charging the batteries.
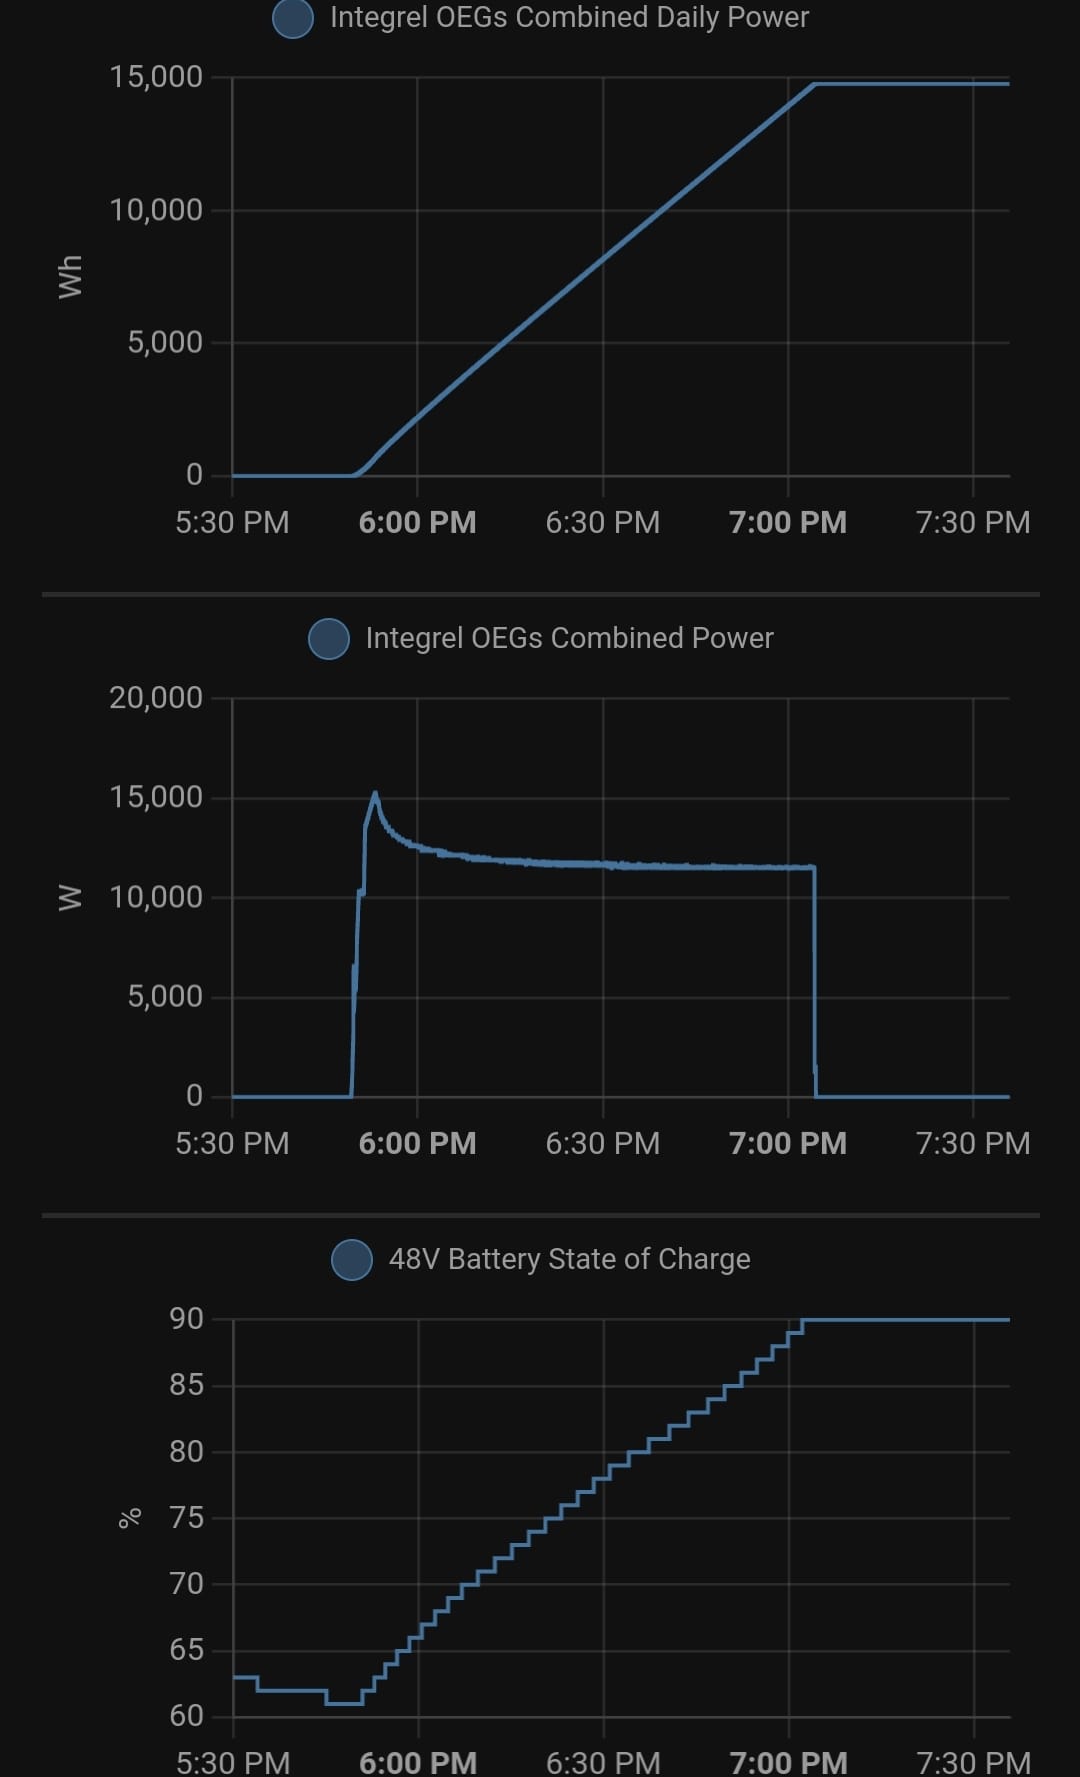
In order to add 9kWh of charge to our 48V batteries, we need to run both engines about 45 minutes, which uses about 1 gallon of fuel. In the graph below, we ran for about 1 hour 15 minutes (from 5:50pm to 7:05pm) and added almost 15kWh to our 48V batteries, taking them from 61% charge to 90% charge.
* In reality, people who are running the generators tend to load them up (running at low RPM isn't great for diesel engines), so they turn on AC loads like the aircon units and water heaters. As a result, this increases the fuel consumption, and it doesn't reduce the charging time, so they tend to run their generators longer and burn much more fuel than we do.
Could These Benefits Be Achieved With A Generator?
We've covered the ways that our Integrel system is better than a diesel generator - but is there anything here that's truly unique to Integrel? Could you get these benefits with a generator?
The answer is complicated...technically, yes you could do this with a generator, but in practice the answer is generally no.
Boat builders often just give you a limited menu of options to choose from. Some boat builders will allow a lot more customization, at quite a cost. We ordered our boat with the bare minimum of electrical components and had everything installed after the boat was delivered. We couldn't have had our system installed at the factory for any amount of money, Leopard just isn't interested in dealing with custom systems.
A different boat builder could allow you to select a DC generator that charges the batteries directly (rather than an AC generator that relies on the inverter/charger to convert from AC to DC), and they could allow you to select a 48V battery bank. There's nothing from a technical perspective that prohibits this. The issue is finding a builder who will work with you and allow you to do so. And not cost you an arm and a leg for it. Even if you can do this, you don't get the benefit of redundancy with 2 engines.
In many cases, it's far easier to select the bare minimum options and have the system installed after-market. Our Integrel system ended up costing much less than the diesel generator would have, which helped pay some of the costs for the large LiFePO4 battery bank that we were going to get anyway!
Integrel vs Diesel Generator - Drawbacks
Of course, there are a few drawbacks to the Integrel system.
We put more hours on our propulsion engines when we use them to charge while at anchor, which impacts resale value and increases maintenance frequency. Most buyers are more willing to accept high hours on the diesel generator. On the flip side, we don't have to maintain a 3rd engine.
The Integrel OEGs suffer from thermal throttling, which means we are producing less power per hour than we could under ideal conditions. Diesel generators use water cooling similar to the propulsion engines, so they don't have thermal throttling. Even with the reduced charge rate due to thermal throttling, we are still producing more power than the diesel generator would!
There are tradeoffs with all things in the boating world, and we feel like this is a good tradeoff to make for us.
Review of New Hardware and Firmware
There are a few new features that are available now that weren't present in the original system that was installed for us back in 2022.
Display Screen Update
The new display screen is pretty much a drop in replacement for the old screen. The mounting bezel is a little different, but it fits in the exact same panel hole as the original, and was very easy to install. I appreciate this attention to detail - it even uses the same screws and screw holes to mount the bezel. Nice!
With the old display, the touchscreen was separate from the screen controller box. These are now combined into a single unit. Fewer components and fewer cables is always a good thing.
I'm sure there are a number of changes behind the scenes that I'm not aware of, but the touchscreen features are about the same as before.
The GUI design is improved, but I don't think there is anything about it that couldn't be implemented for the older screen.
It seems like the new screen might be more responsive, but the difference isn't huge.
The most important change that I can see is that the new display now supports a WiFi access point!
When enabled via the touchscreen, you can then connect to it from your laptop, and then use your laptop to perform firmware upgrades. This is really nice! No need to fumble around with USB drives and a hard-to-reach USB port on the back of the display controller any more!
To my knowledge, there is no plan to give the screen the ability to connect to your existing WiFi network. Generally, I think this is fine. It's meant for diagnostics and support, and leaving Wi-Fi on all the time would just cause it to use more power unnecessarily.
Controller Update
The new controller boxes (one for each engine/OEG) are very much a drop in replacement for the old ones. The various cables connect in the same locations, and it uses the same mounting screws and screw holes.
There are 2 changes that are noteworthy. First is that the USB C diagnostic port has been moved from the front/top side to the back/bottom side (where the rest of the cable connectors are located).
I strongly recommend buying long USB C data cables (6-10ft, 2-3m) and leaving them attached, running the other end to a location that's easy to access. This is in case you need to plug your laptop in to change settings or to download diagnostic info for the Integrel engineers to analyze.
The second change is the addition of an N2K port that is used to read data from the BMS, and to send data related to power generation statistics.
System Changes
In order to make full use of the new hardware and FW, I had to make a few changes to my system. Most of this is centered on getting things connected to the Raymarine STng network.
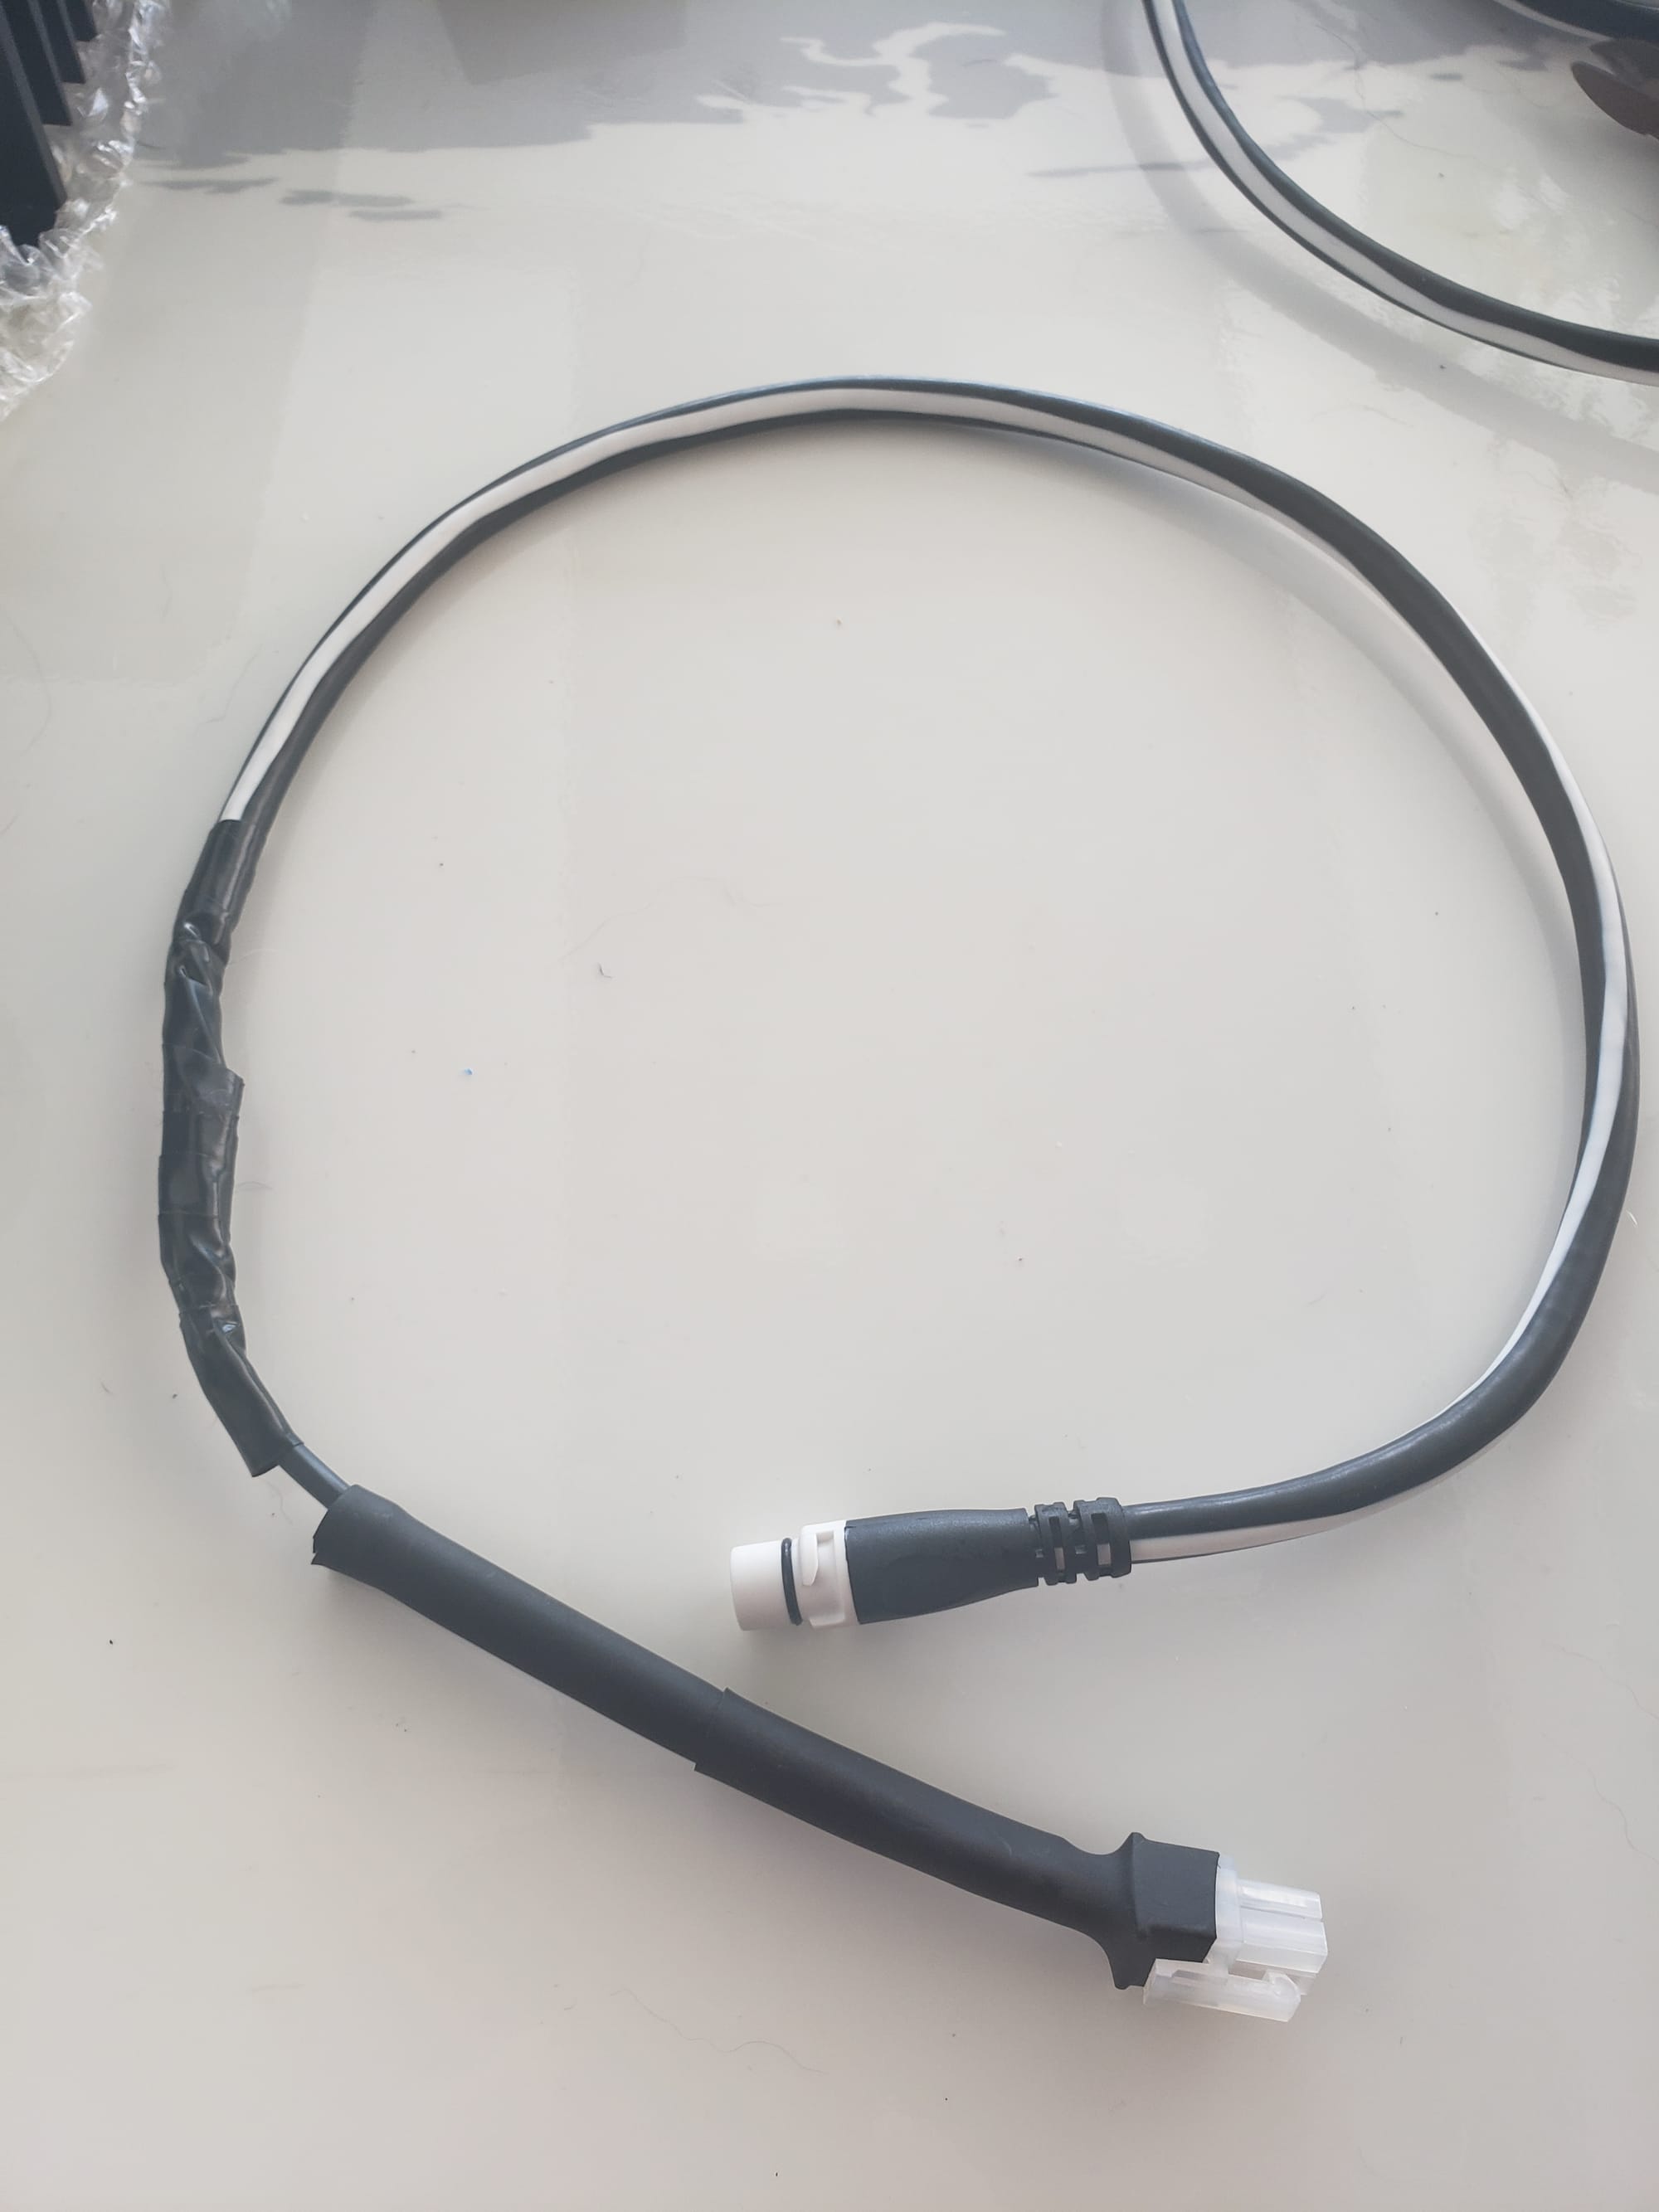
Butchering the STng Cable
Most modern marine electronics focuses on connecting to a standard N2K network, as they should, given that this is the standard.
We have Raymarine equipment on board which uses the STng network. STng is fundamentally N2K with special connectors. I find the regular N2K connectors to be perfectly fine, waterproof, and actually easier to plug and unplug. According to Raymarine, their STng stuff is easier to run in small conduit because the connectors are smaller. This is true, but the small size also makes them harder to unplug. In any case, it would cost a fortune to swap the Raymarine stuff out for something else, so we just have to deal with what we have.
As a result, it's necessary to butcher some STng spur cables so that we can connect other devices in to the network. Technically, I could purchase a bunch of adapter cables to do the job (e.g. to convert Victron VE.can to N2K and then another to convert N2K to STng), but these adapters are expensive and hard to get in small Caribbean islands. It's much cheaper and easier to make our own cables.
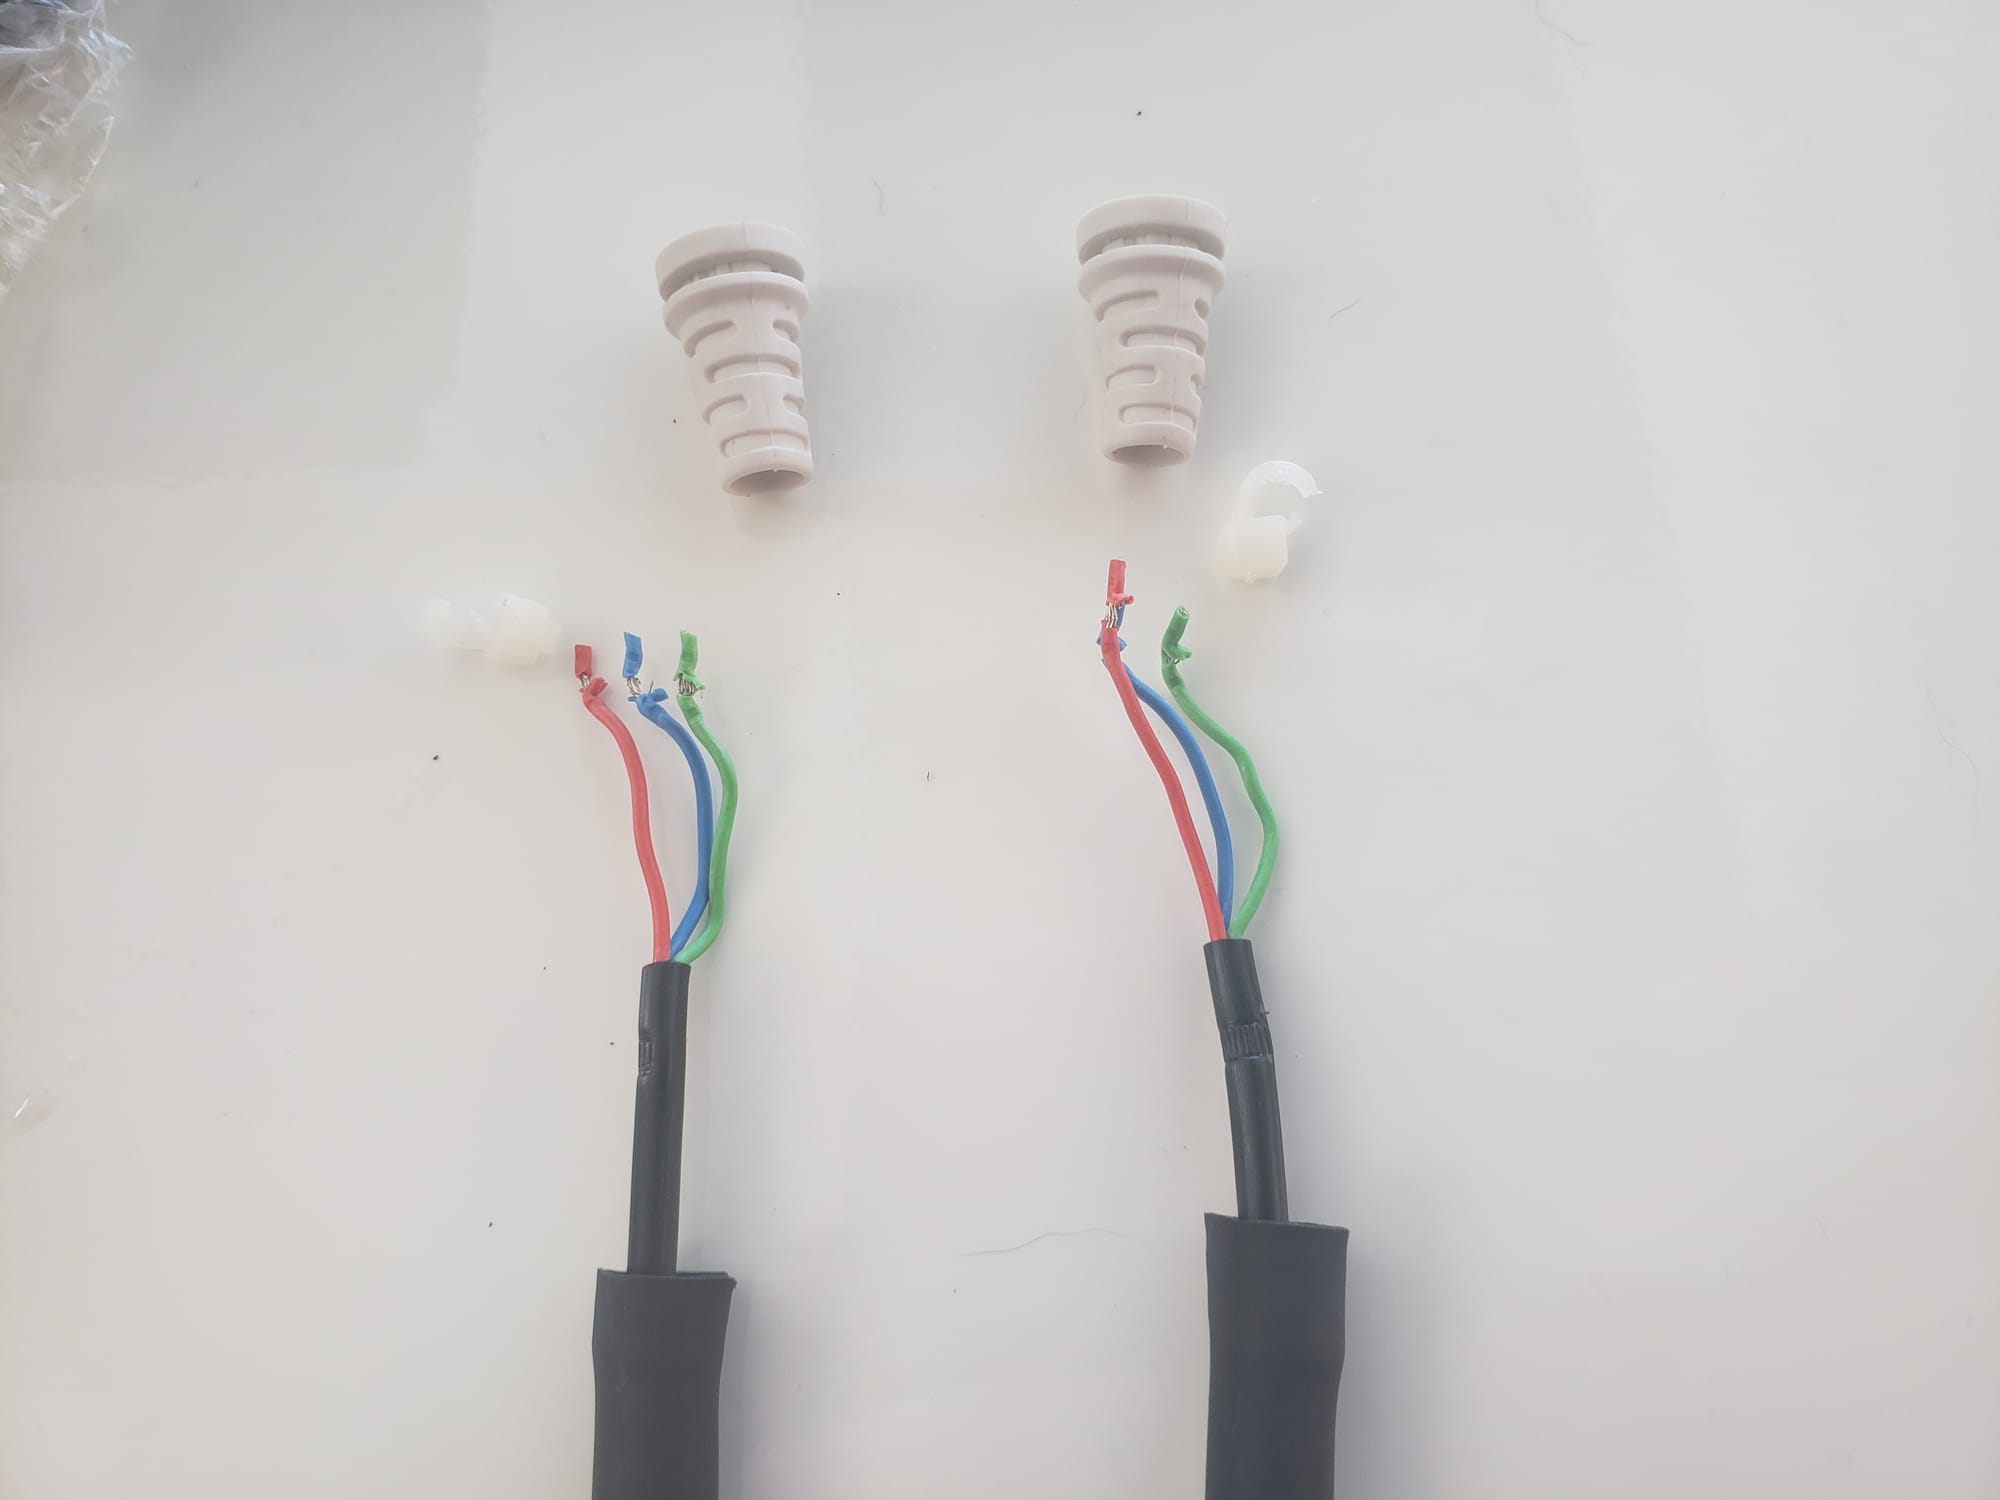
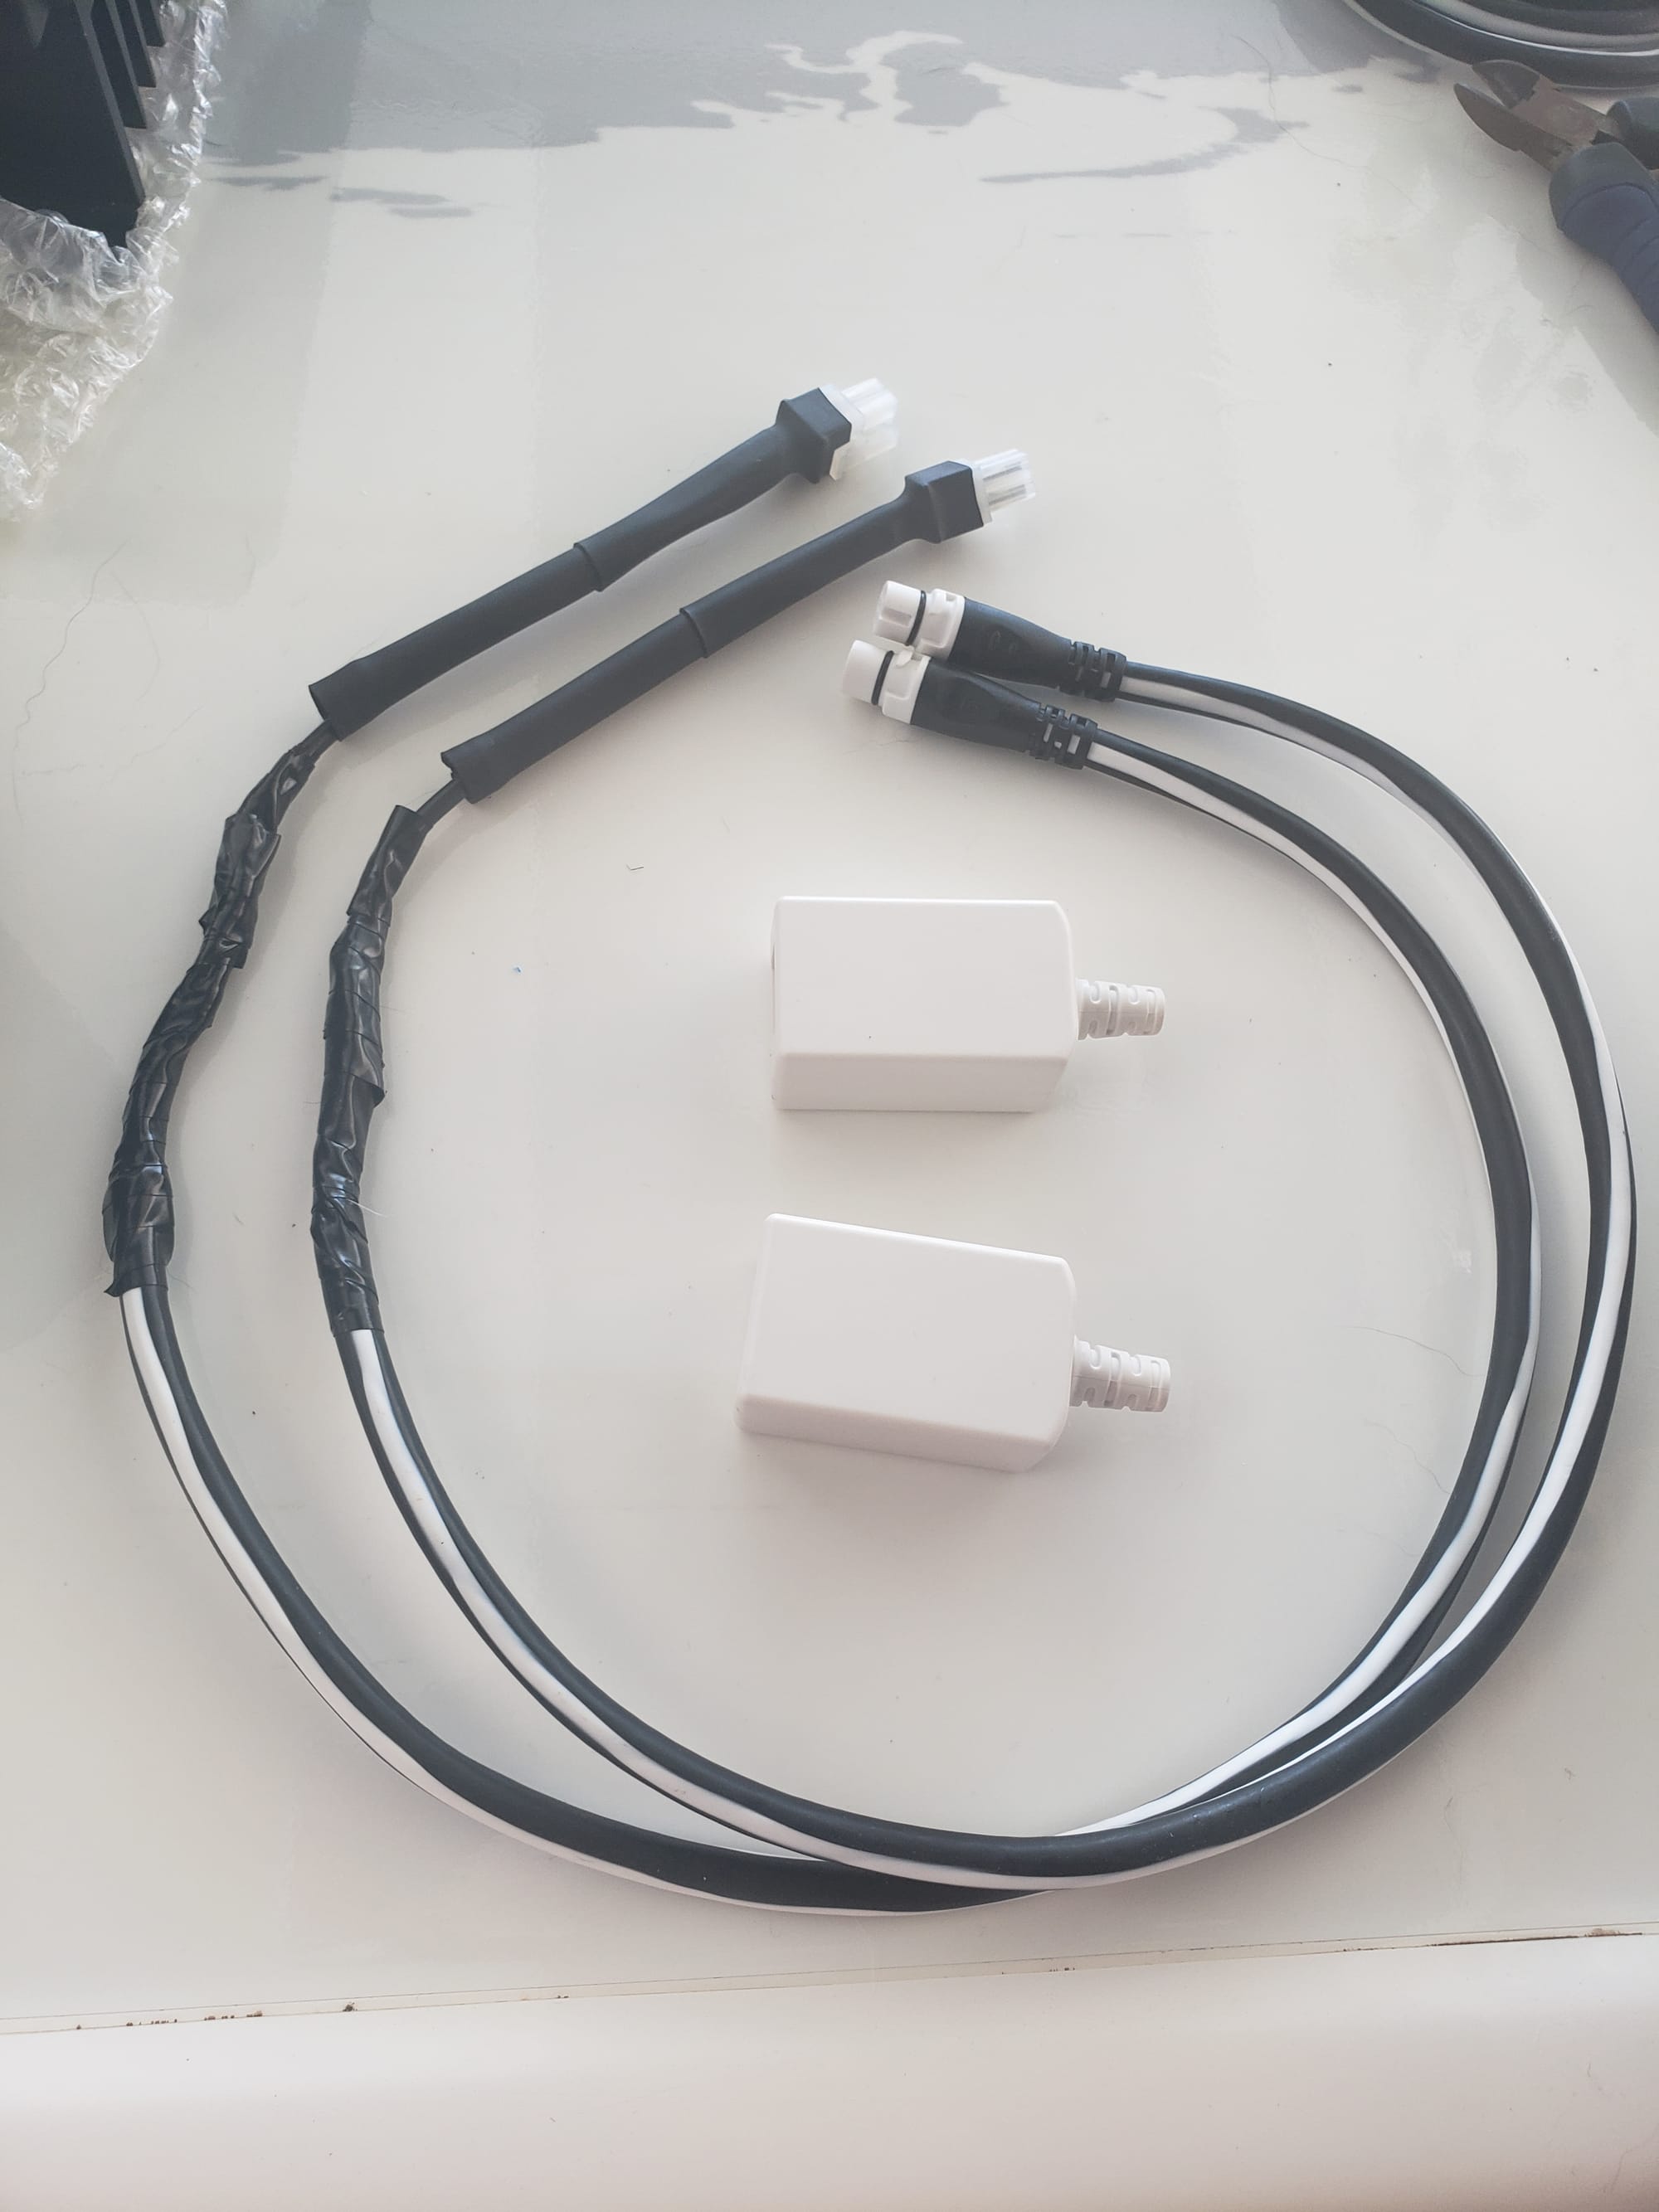
I need to make 3 adapter cables, so I will butcher 2 spur cables, giving me 4 segments to use for the STng side of the adapter, with 1 available as a spare for future use.

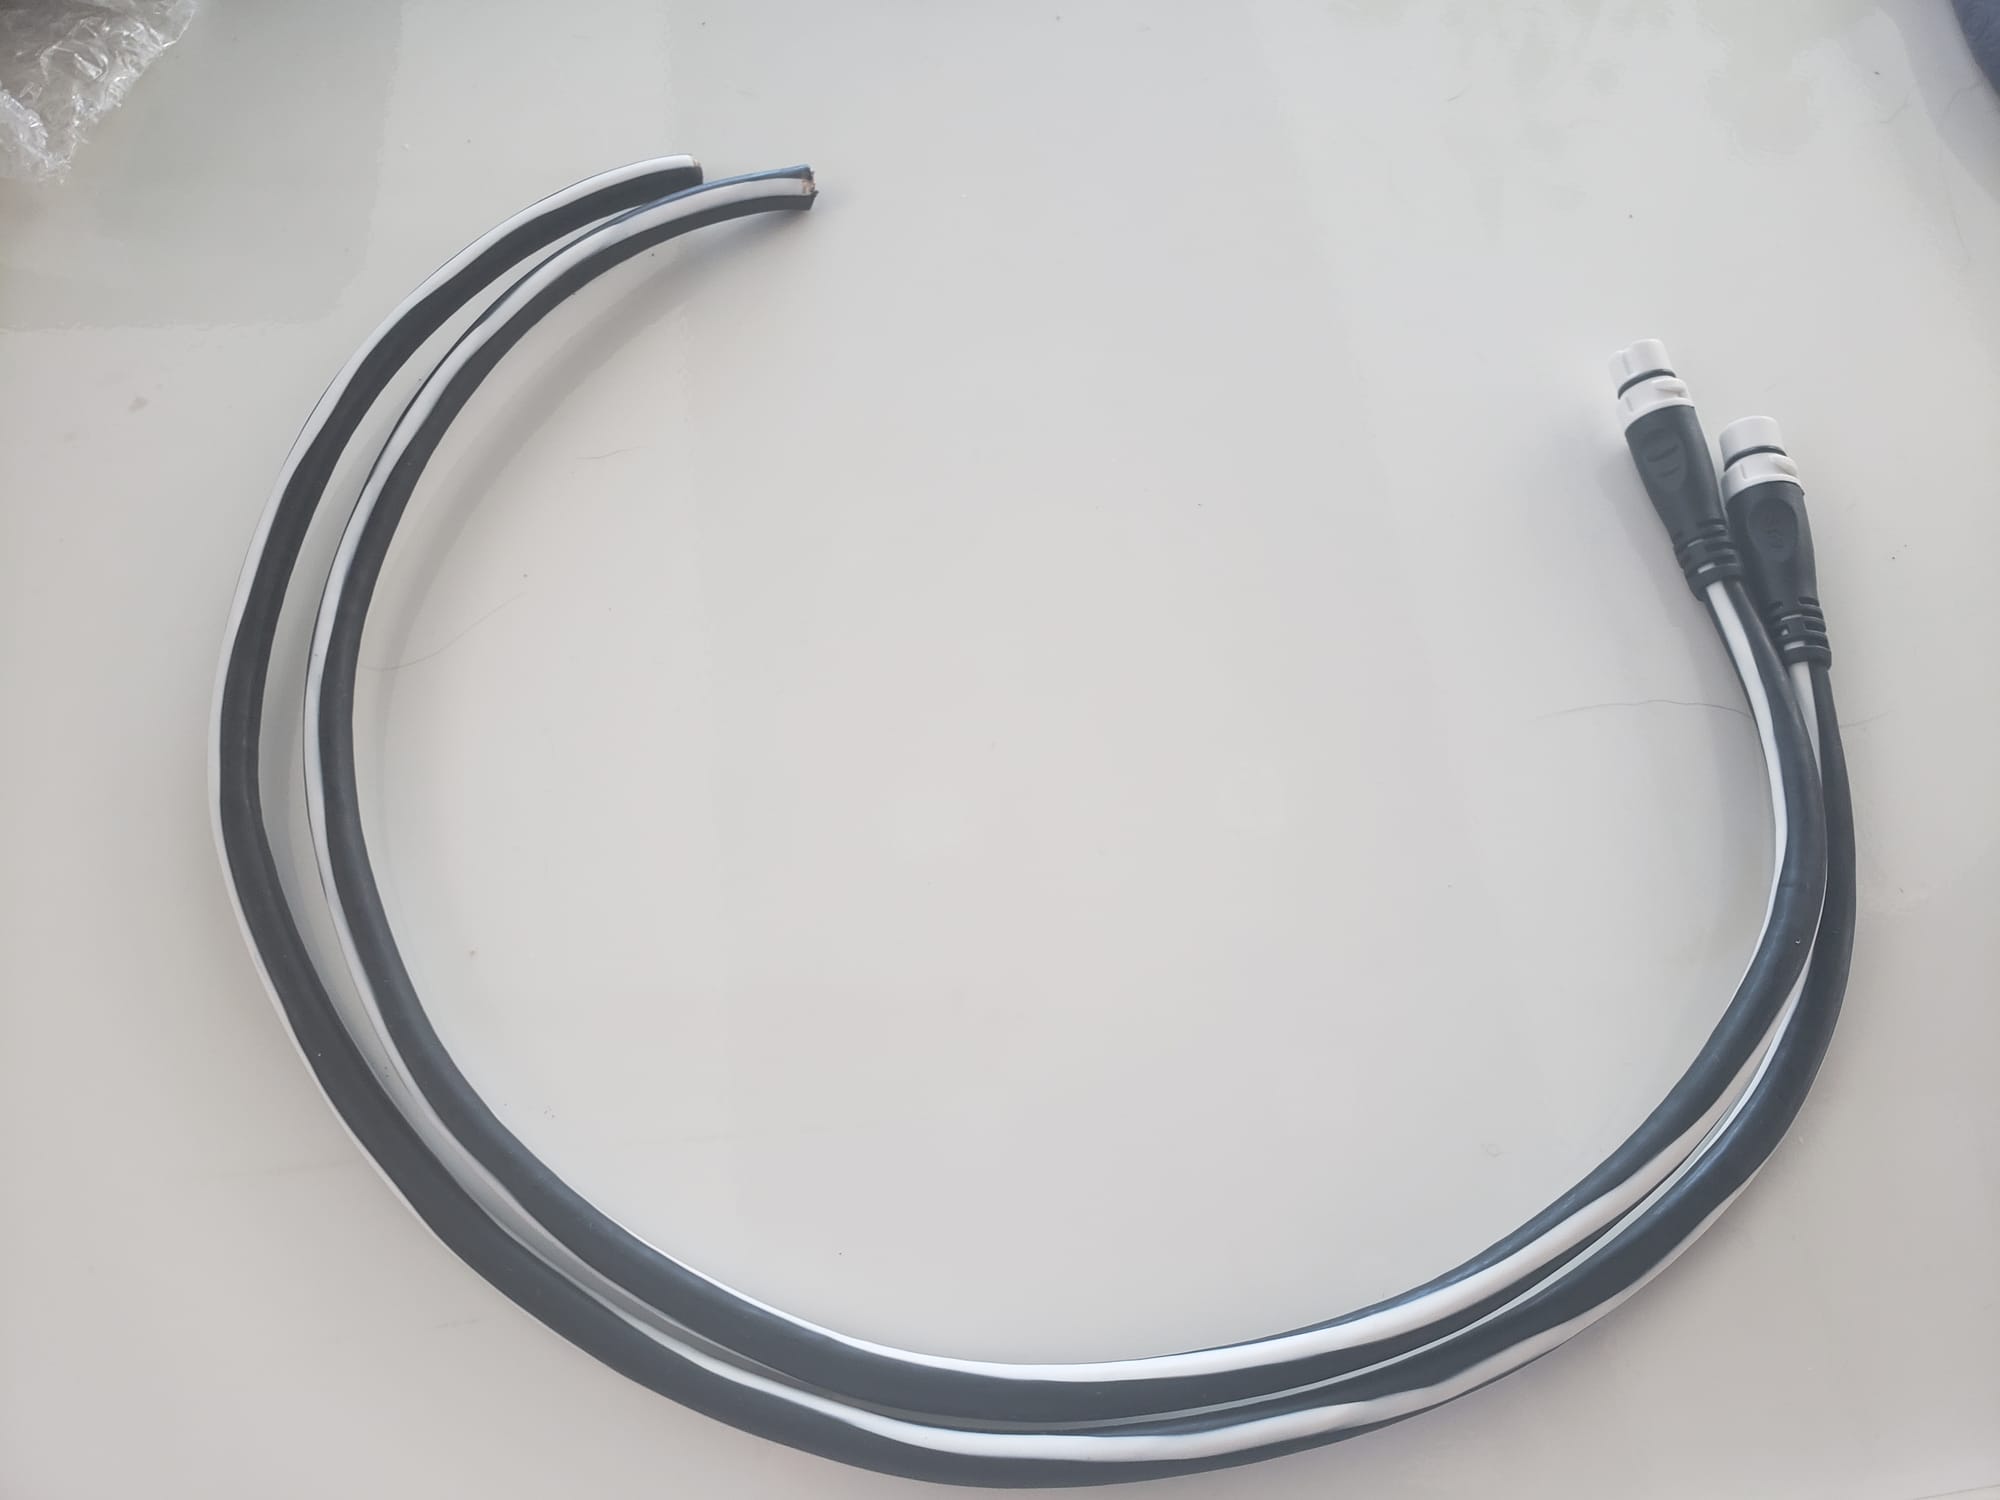
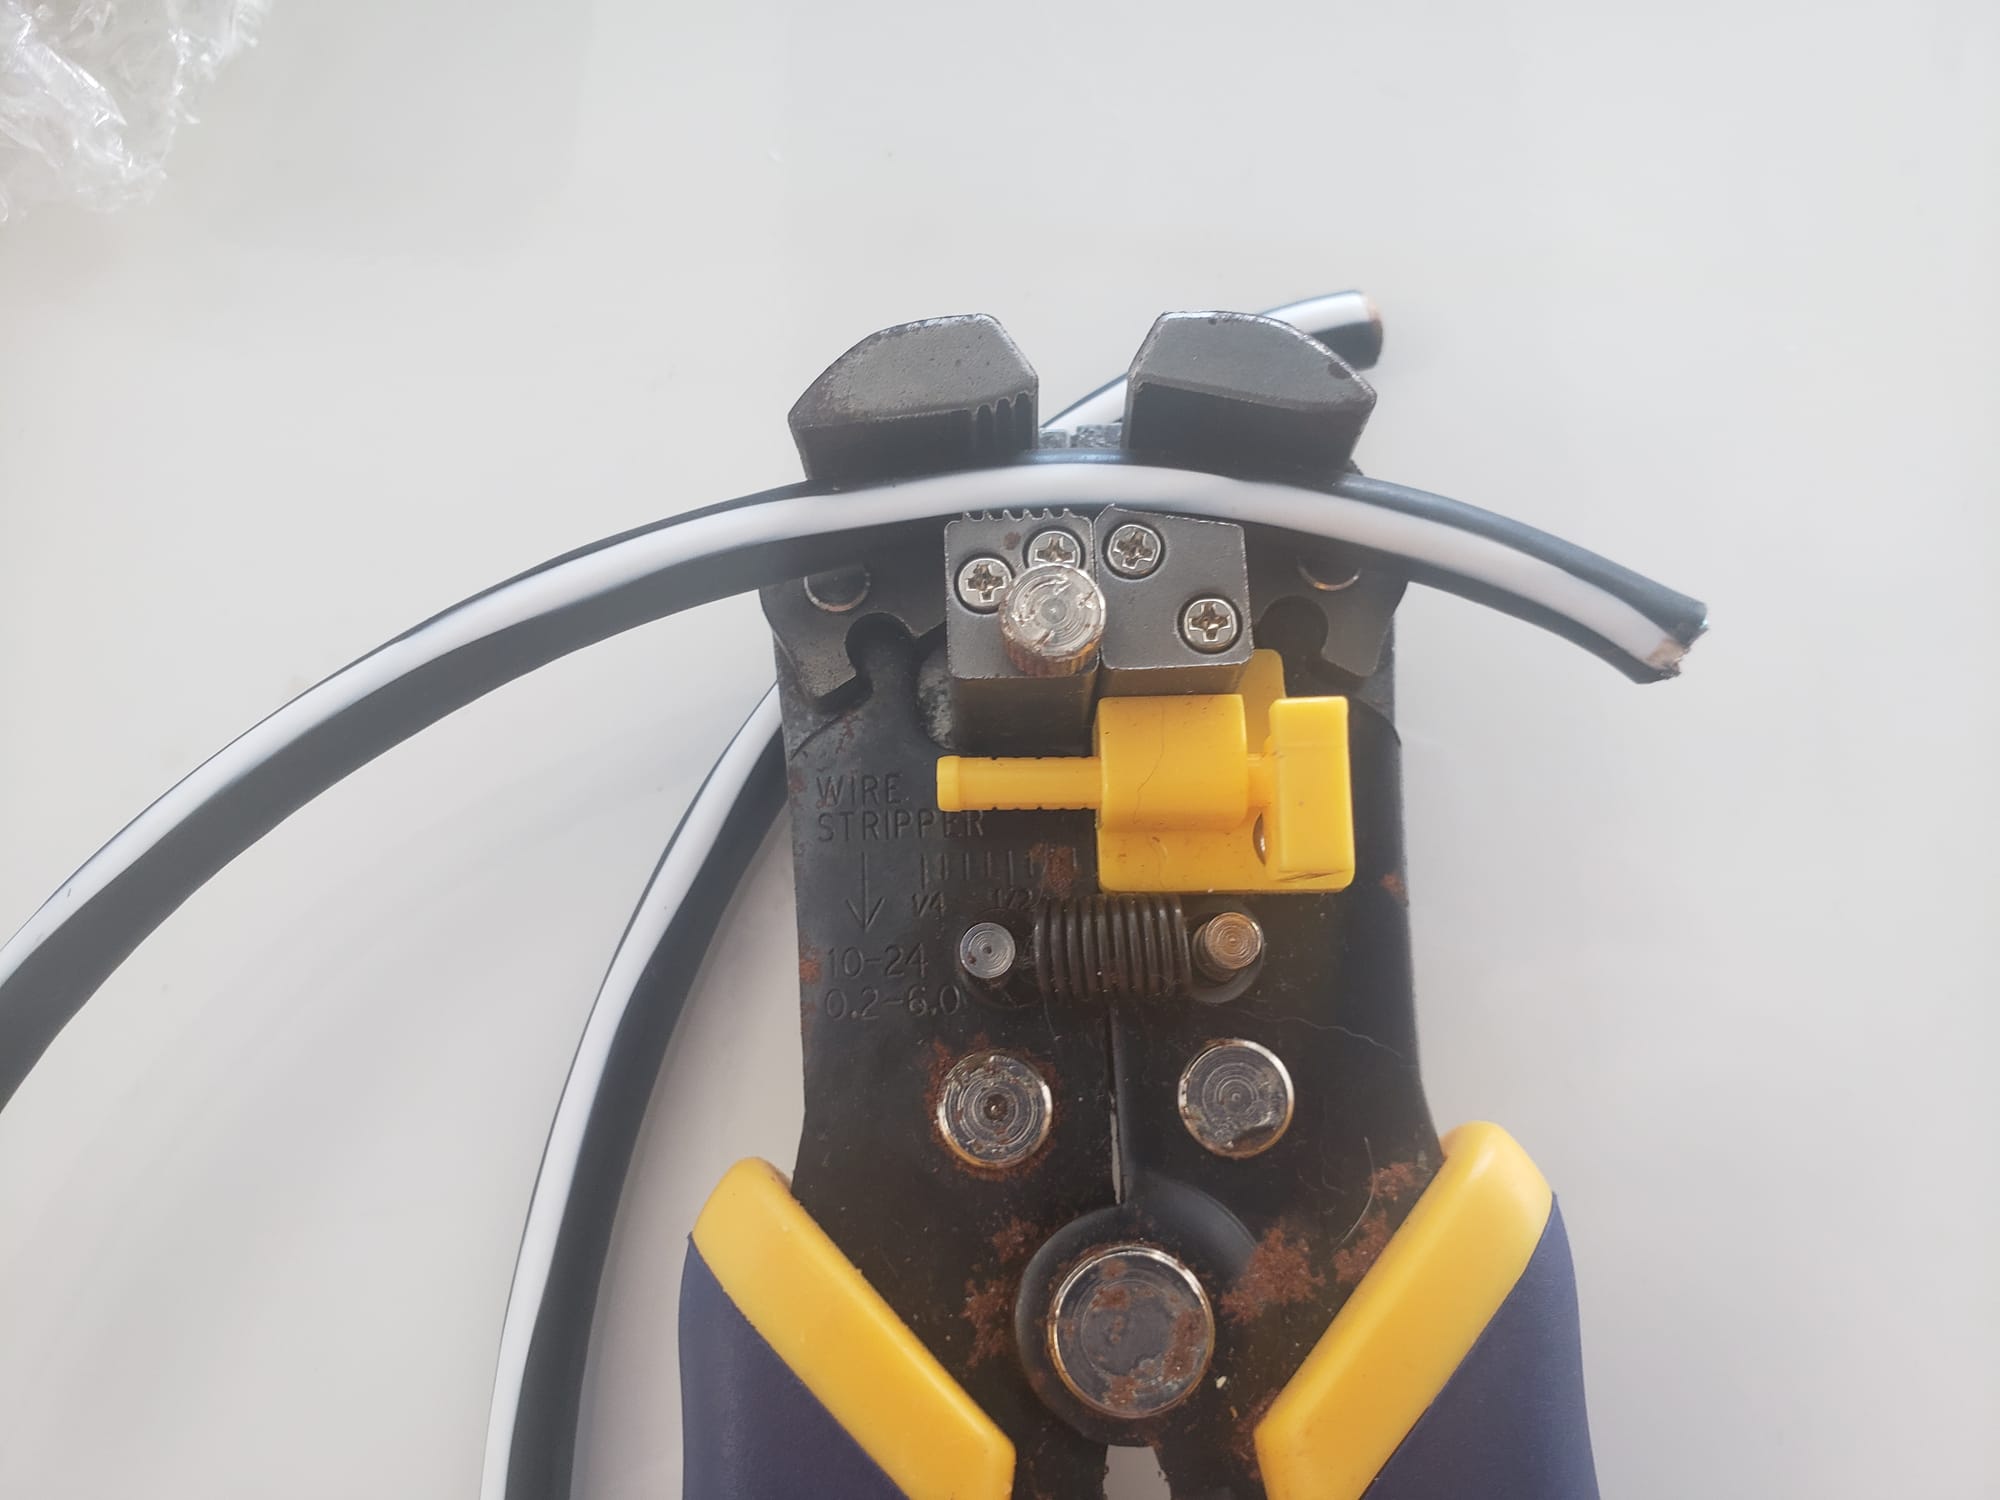
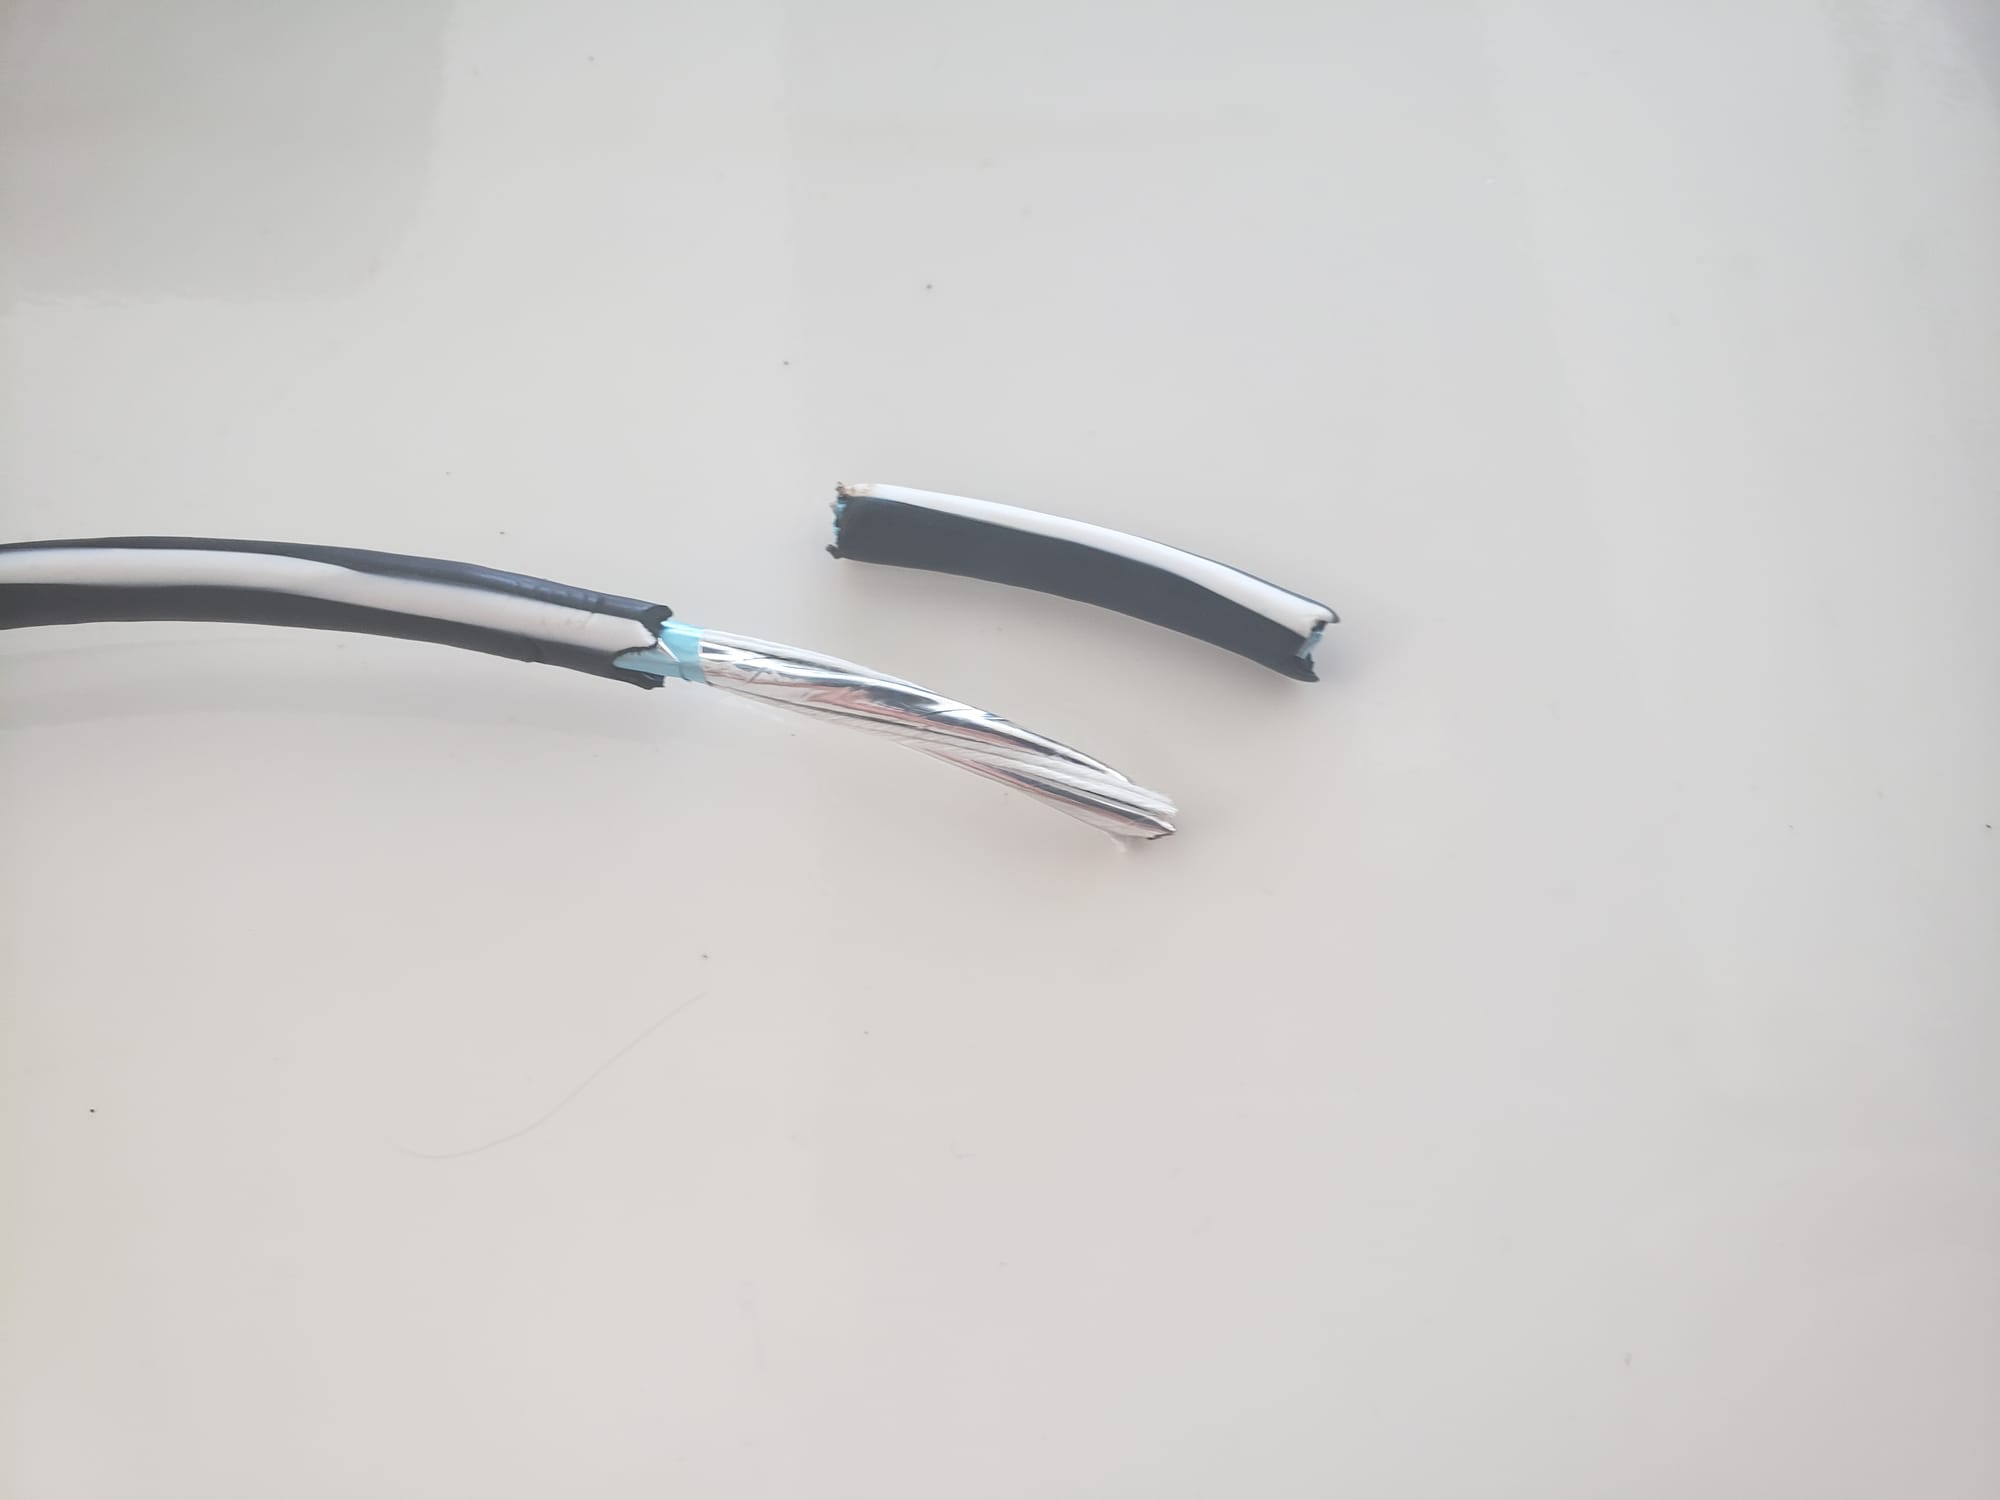
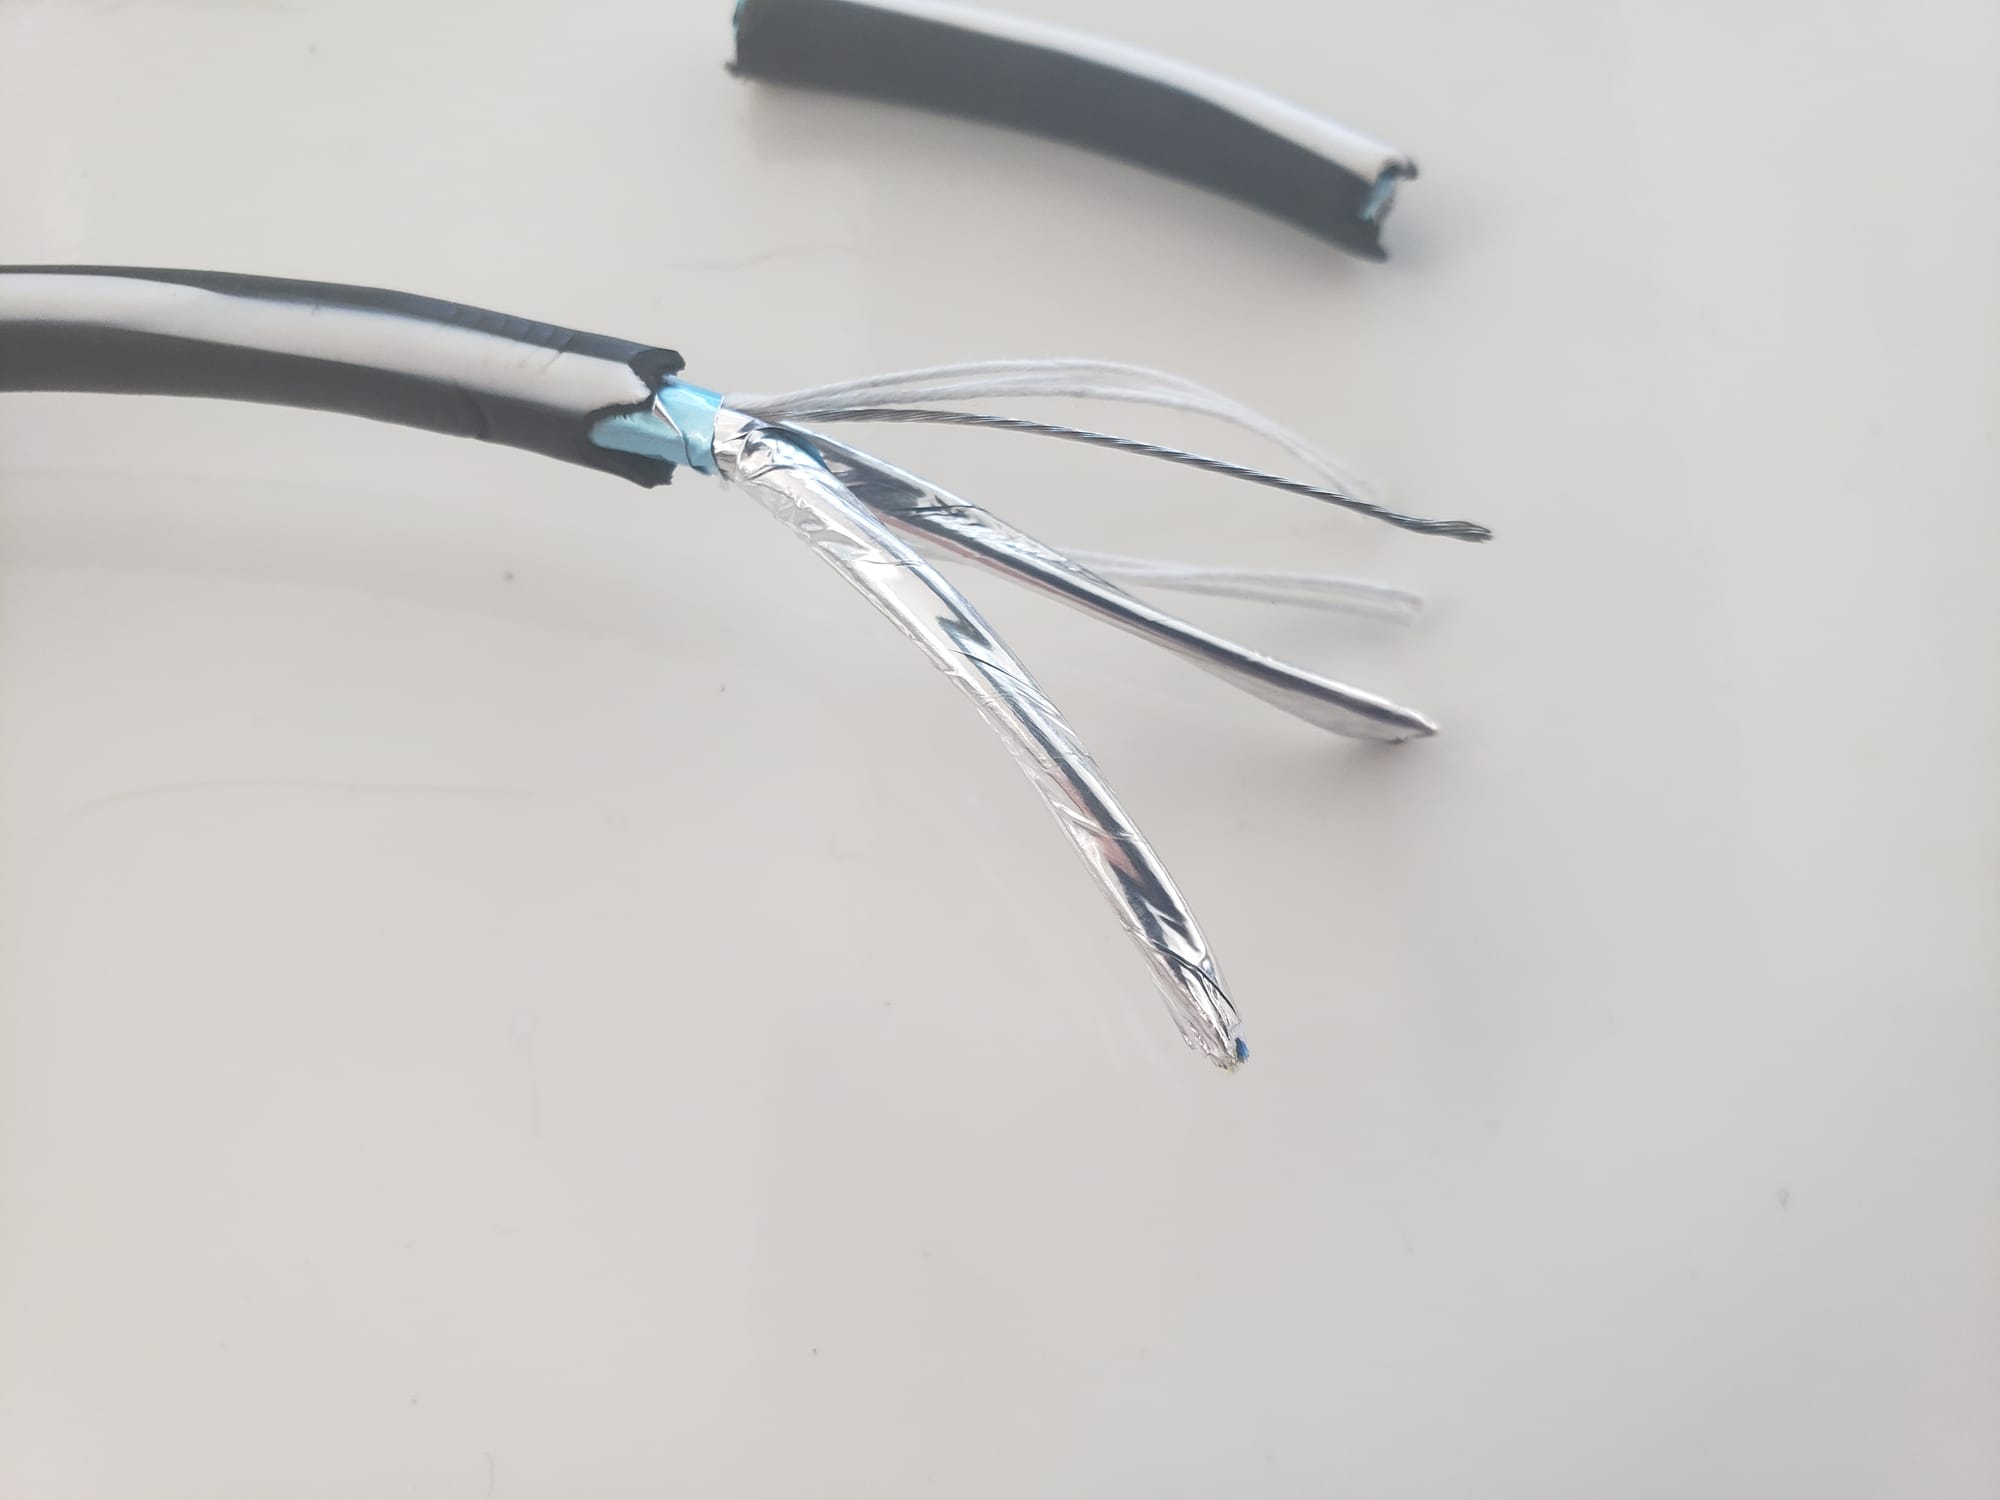
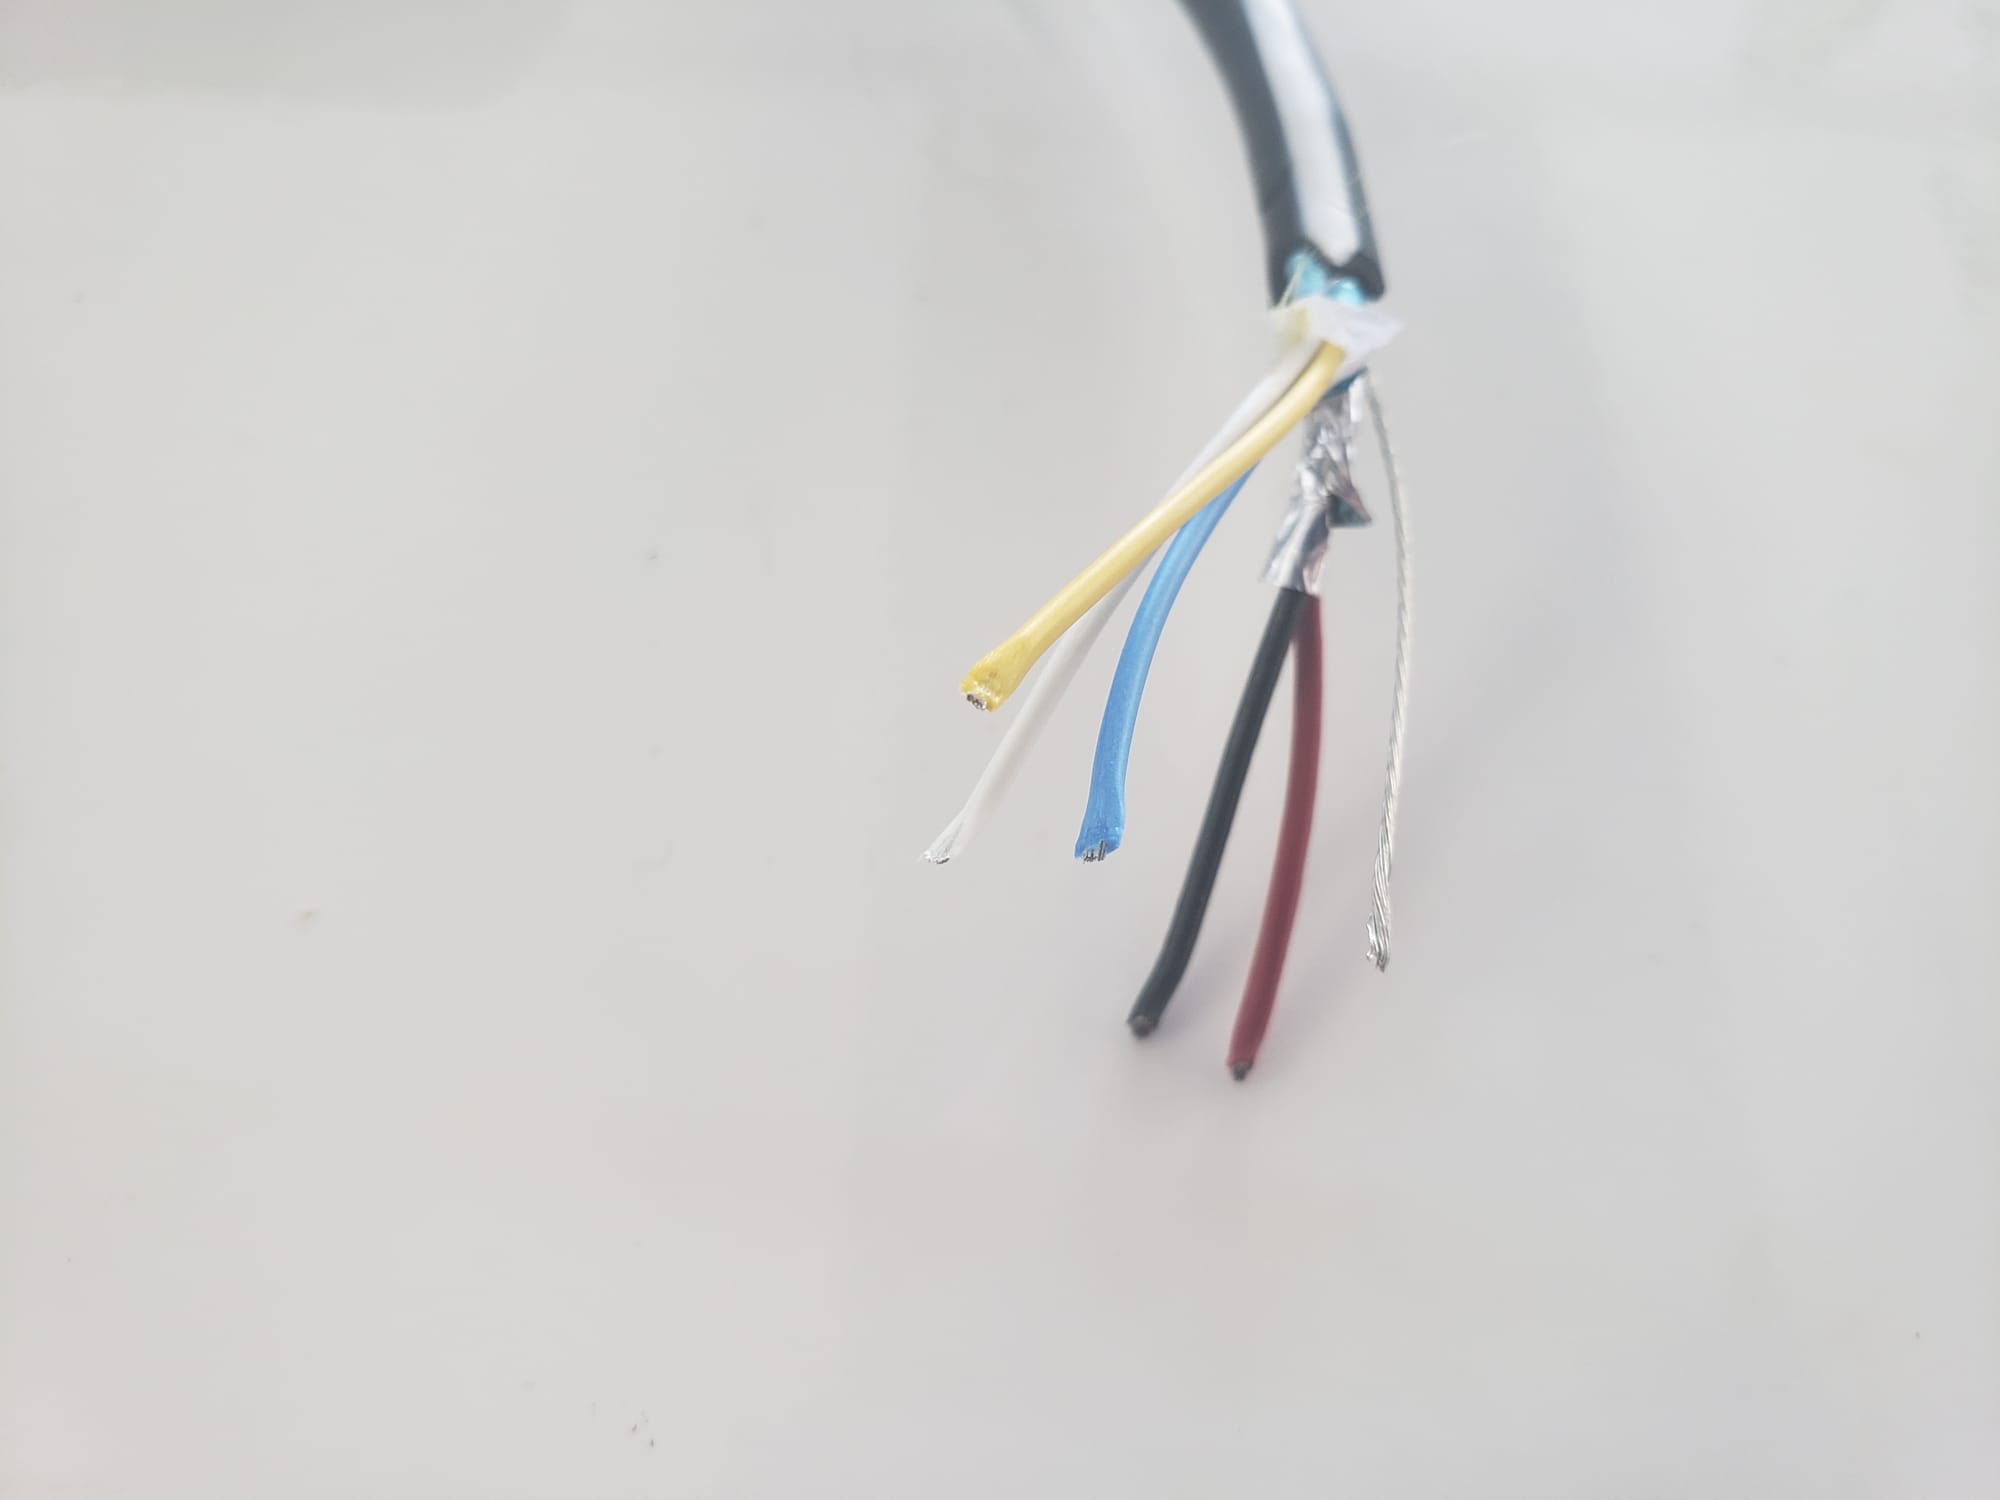
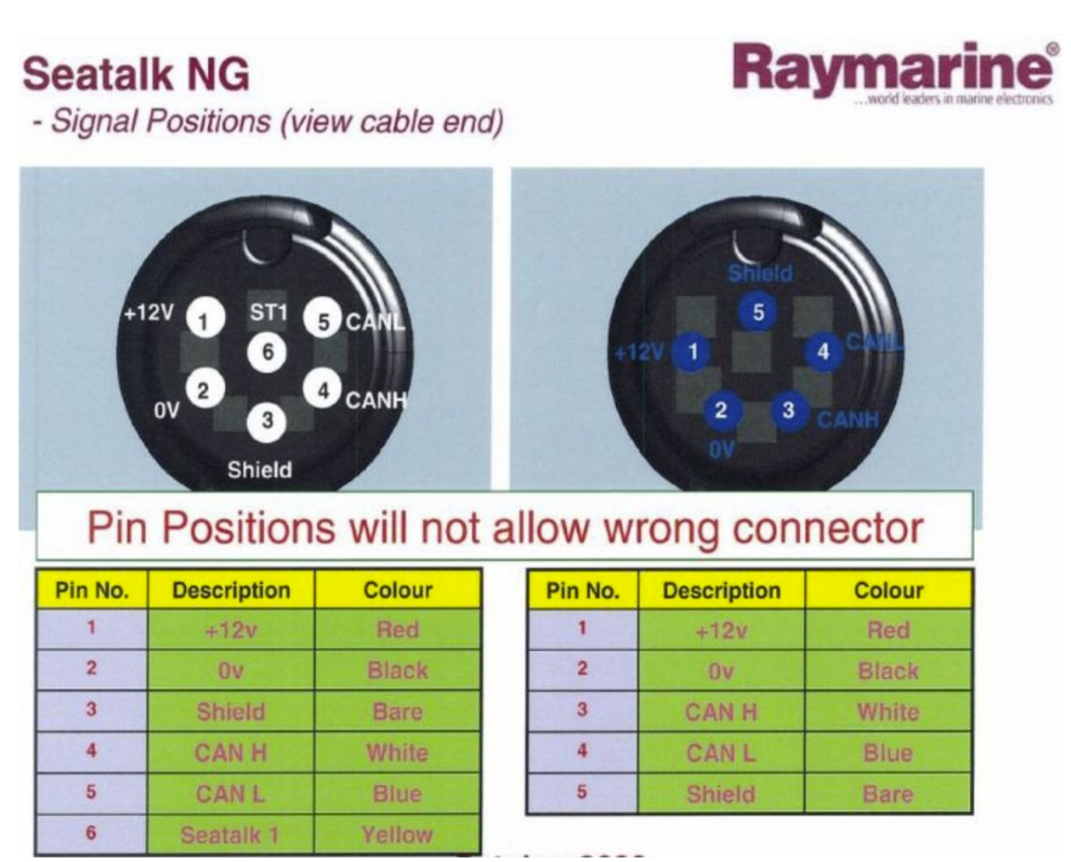
The wire strippers again make short work of removing the insulation for the white, blue and black wires.
With the STng side of the cables appropriately prepared, we are now ready to mate them up with the appropriate device-specific side.
Putting the Victron Cerbo on N2K
The Victron Cerbo is a device that monitors the Victron system, and provides a touchscreen interface to view and control things.
The new Integrel controllers want to talk to the Victron equipment in order to read charging information from the BMS. This is all done over the N2K network, so it is necessary to make sure the Victron Cerbo is connected to N2K.
Victron uses a standard Ethernet RJ45 port for this connection to N2K. They sell an adapter cable, but it uses the standard N2K connector, and we have a Raymarine STng network, so I would need a second adapter cable to convert N2K to STng. Also, as previously noted, these cables are expensive and are not available in the small Caribbean islands.
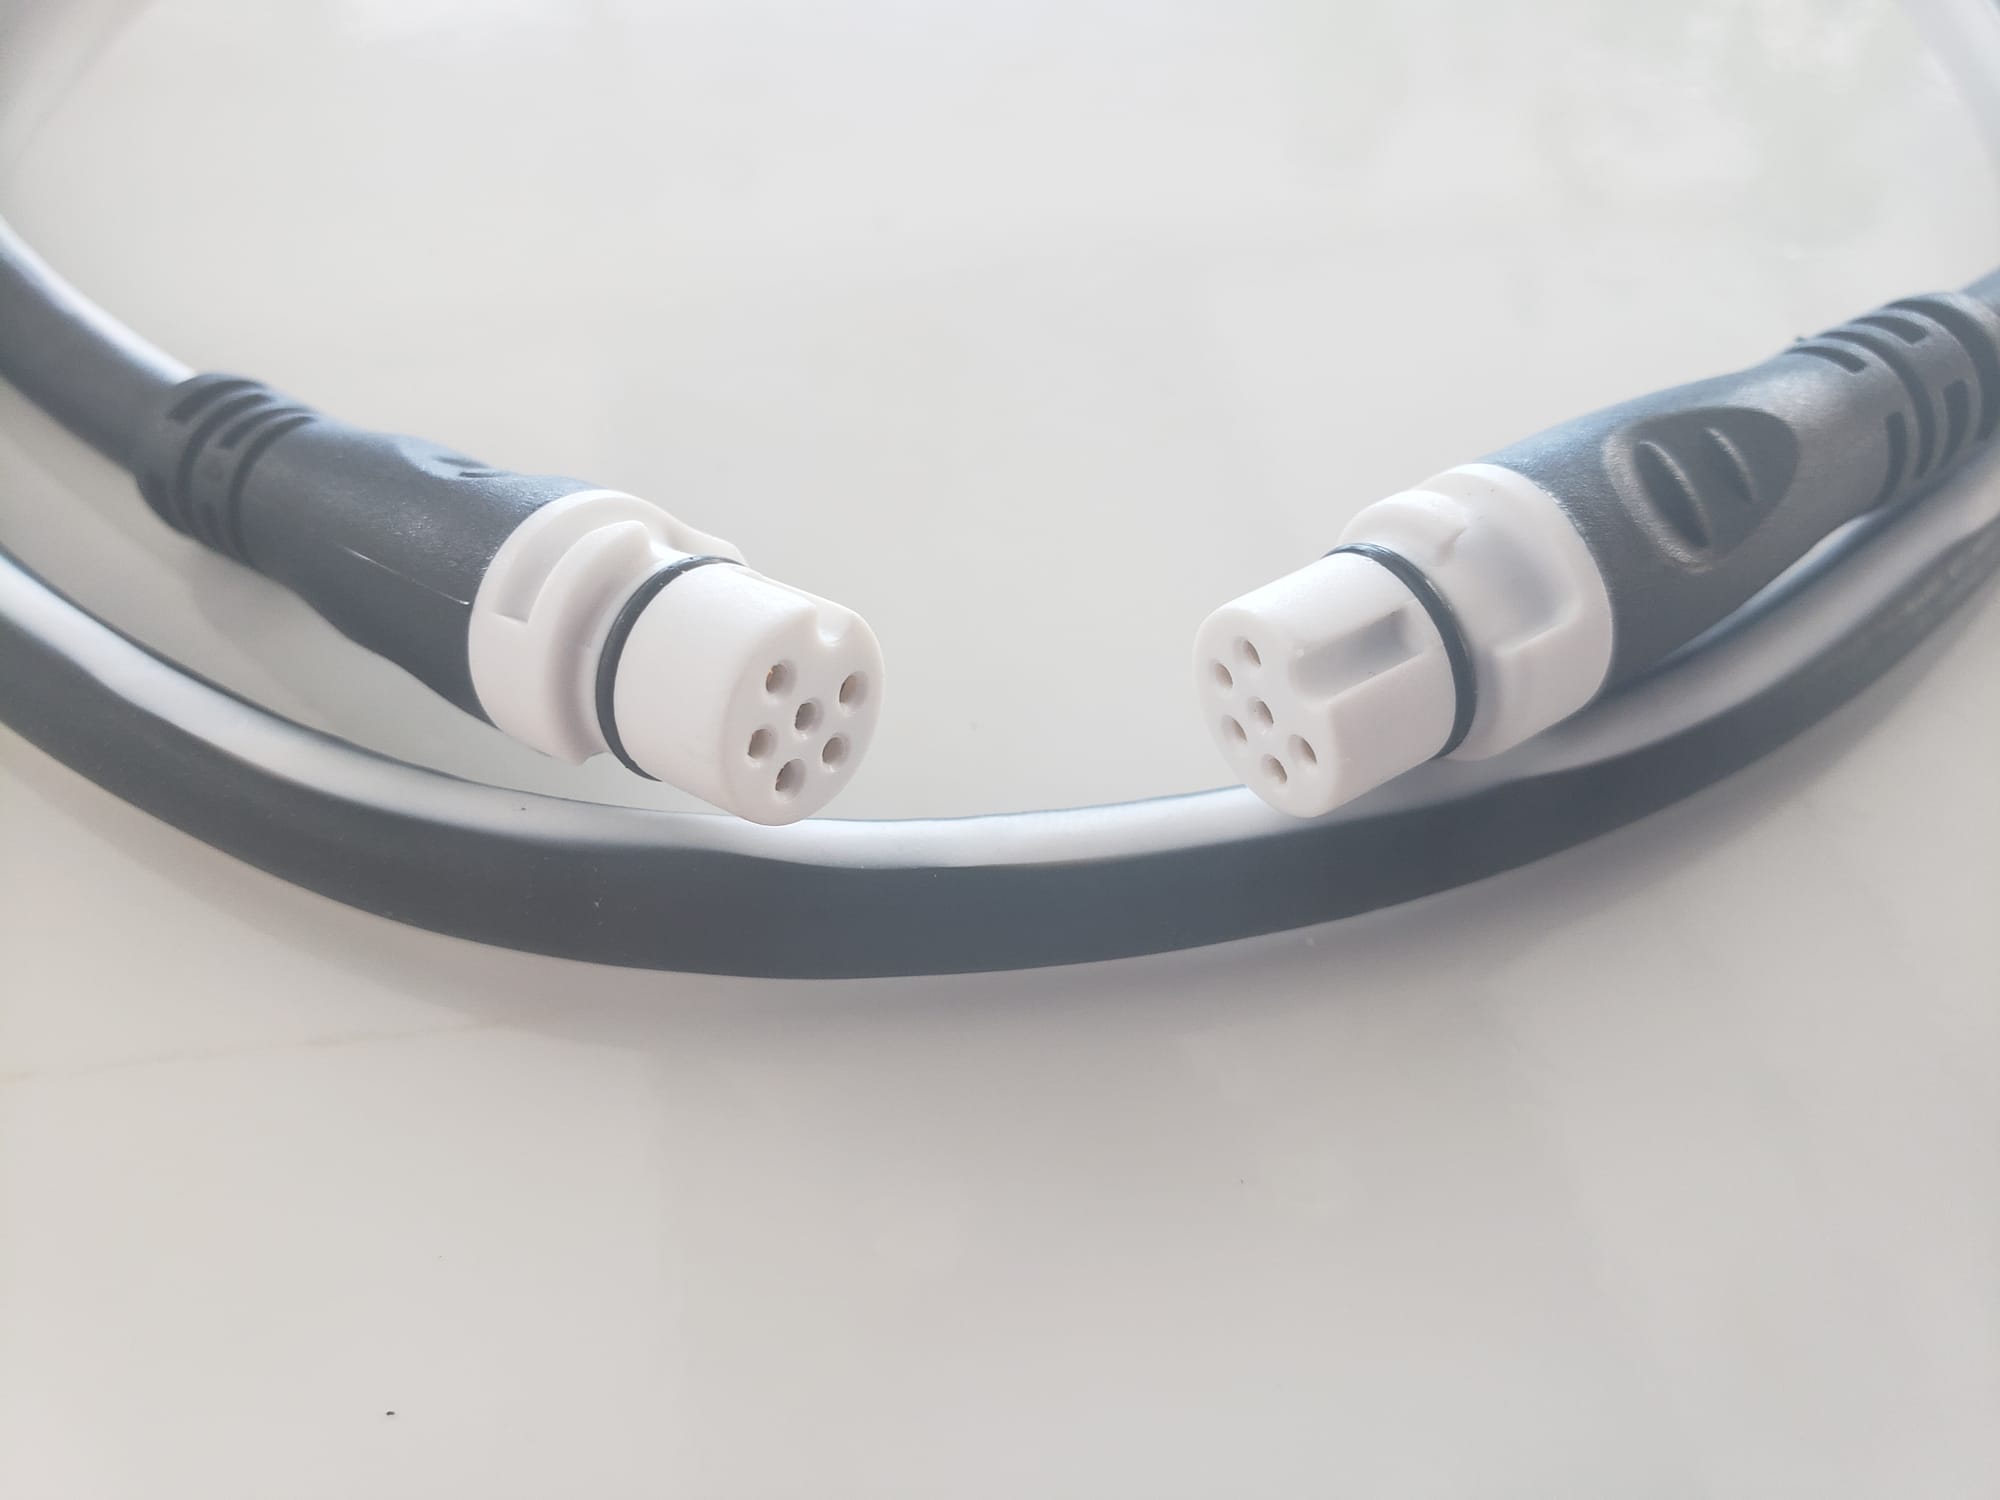
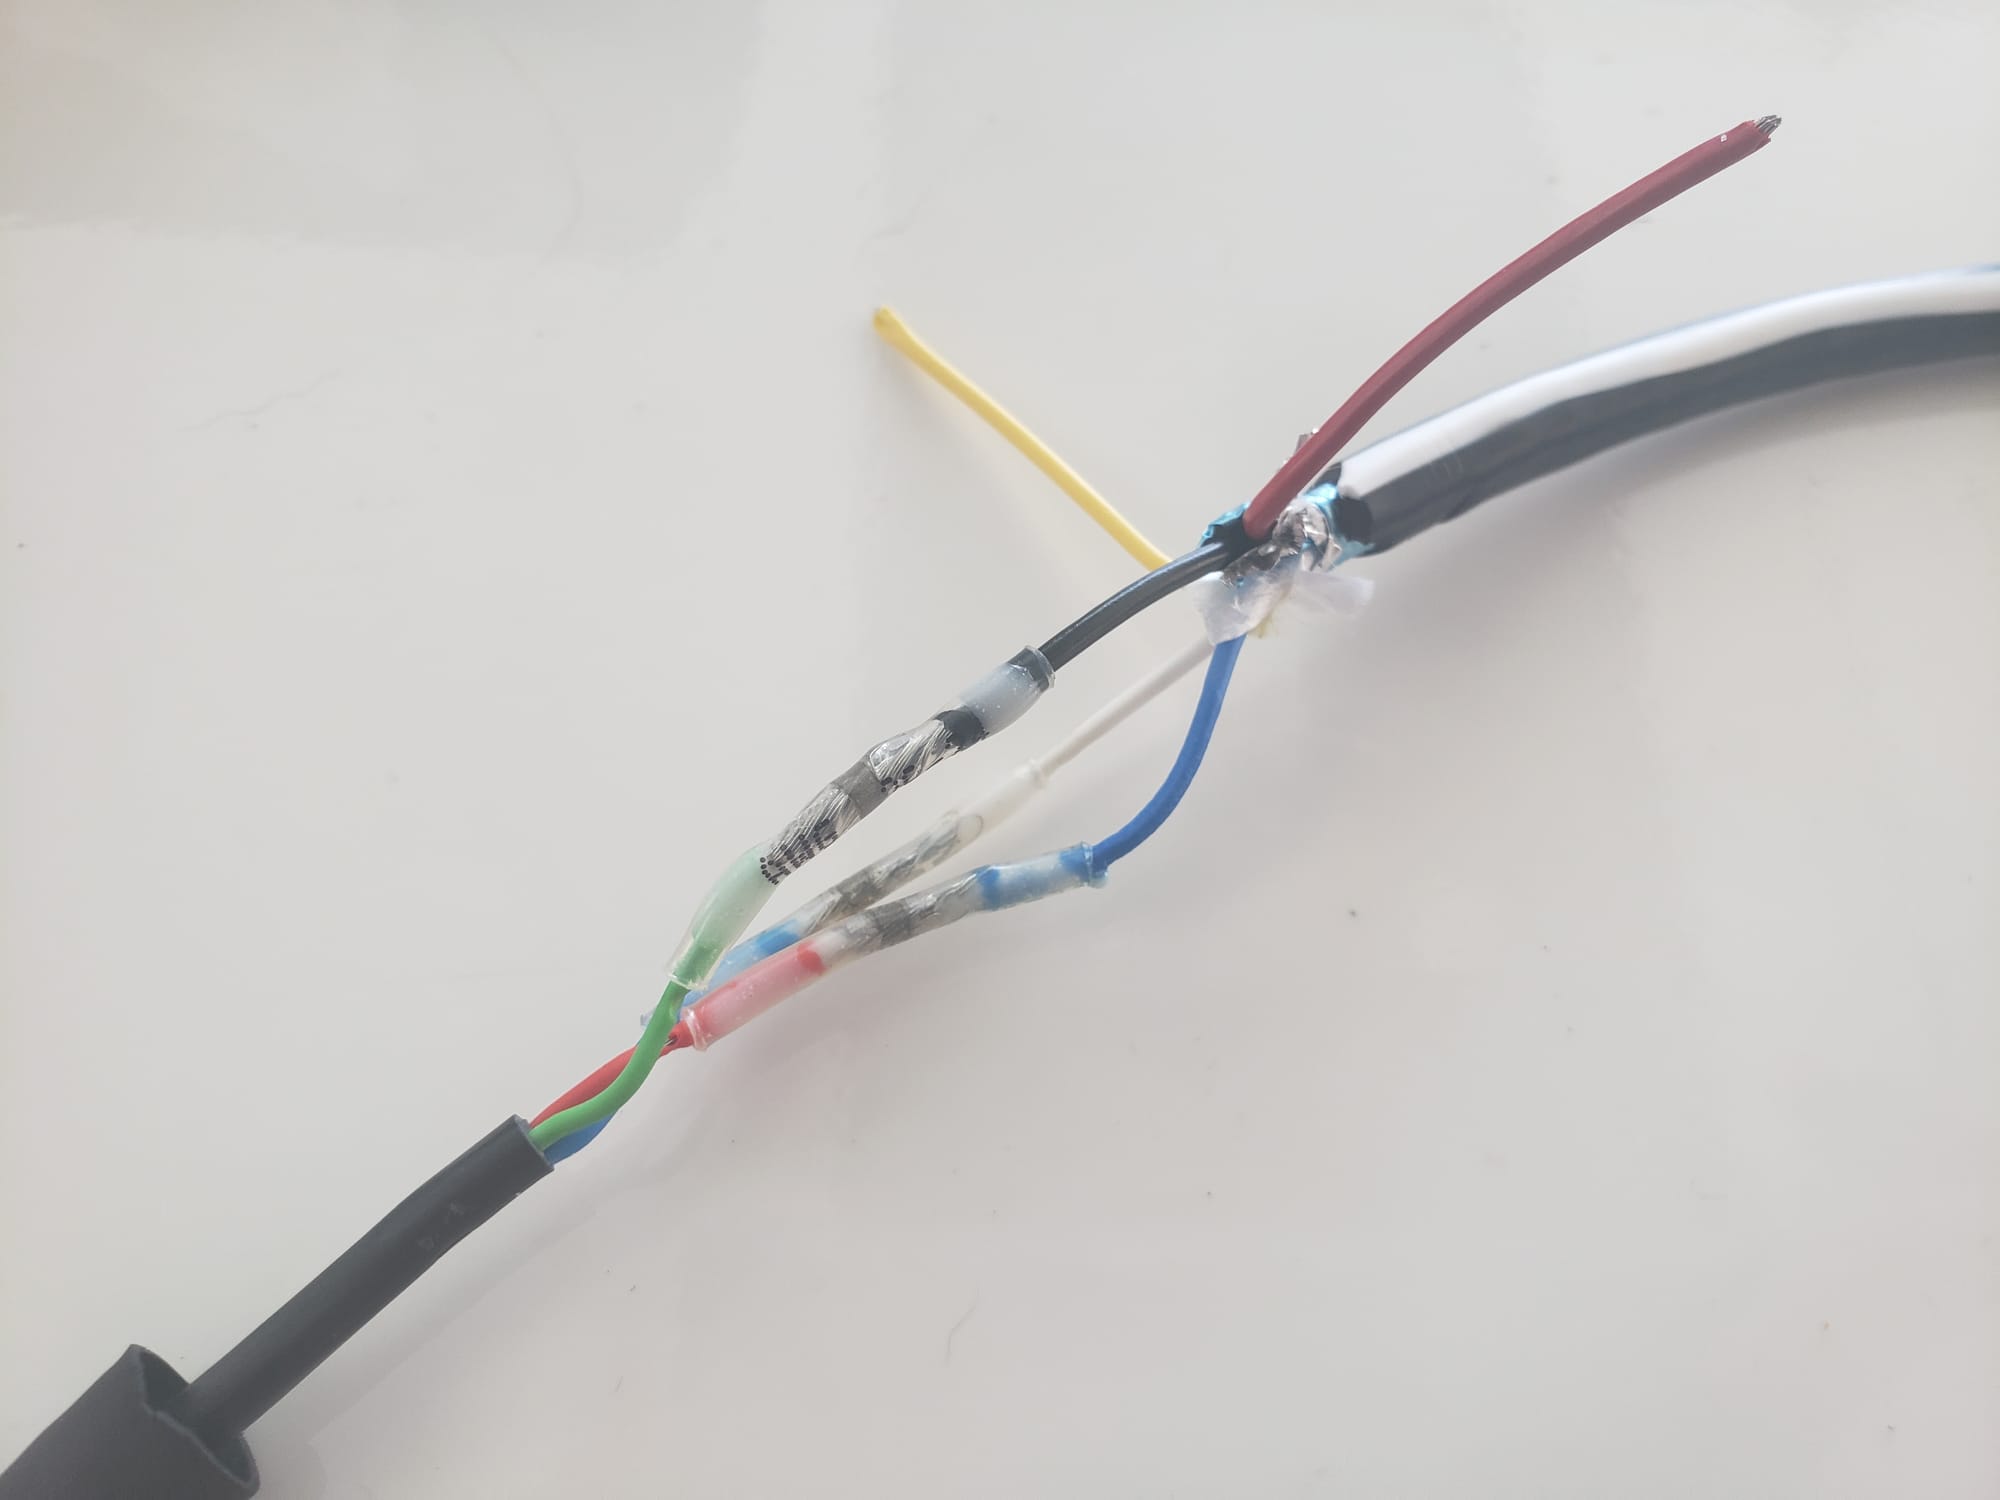
Thankfully, the Victron adapter cable is super simple, only needing 2 of the 8 RJ45 wires to be connected, so it's quite trivial to make our own!
In order to make this cable, we need some cat5e Ethernet cable, a butchered STng spur cable, wire strippers, and some self soldering heat shrink (along with a heat gun).
The Victron VE.can connector is a standard RJ45 ethernet socket. They use pins 7 and 8 as the CAN-H and CAN-L signals, so we just need to cut the cable and expose the brown and white-brown wires for this purpose. All other wires must be insulated from each other to prevent short circuits. Victron recommends against connecting any other wires, especially power and ground, since the Victron system can run on 48V (as it does on our boat) and this would be incompatible with the required 12V power for N2K.
With the appropriate wires exposed, we make use of a self-soldering heat shrink connector and a heat gun to make a robust, moisture-proof splice between the wires, and wrap everything up in electrical tape as the insulating layer for the other wires.
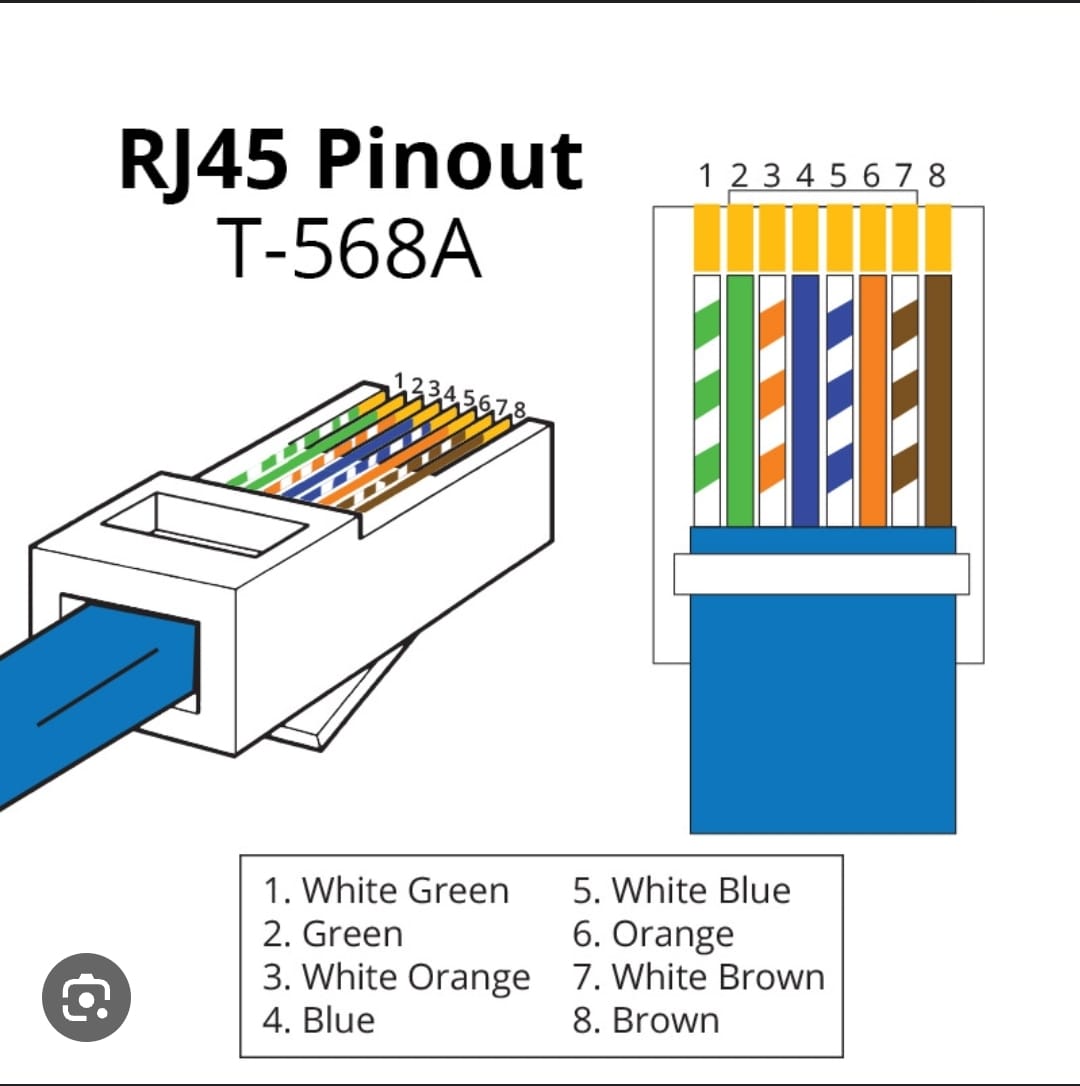
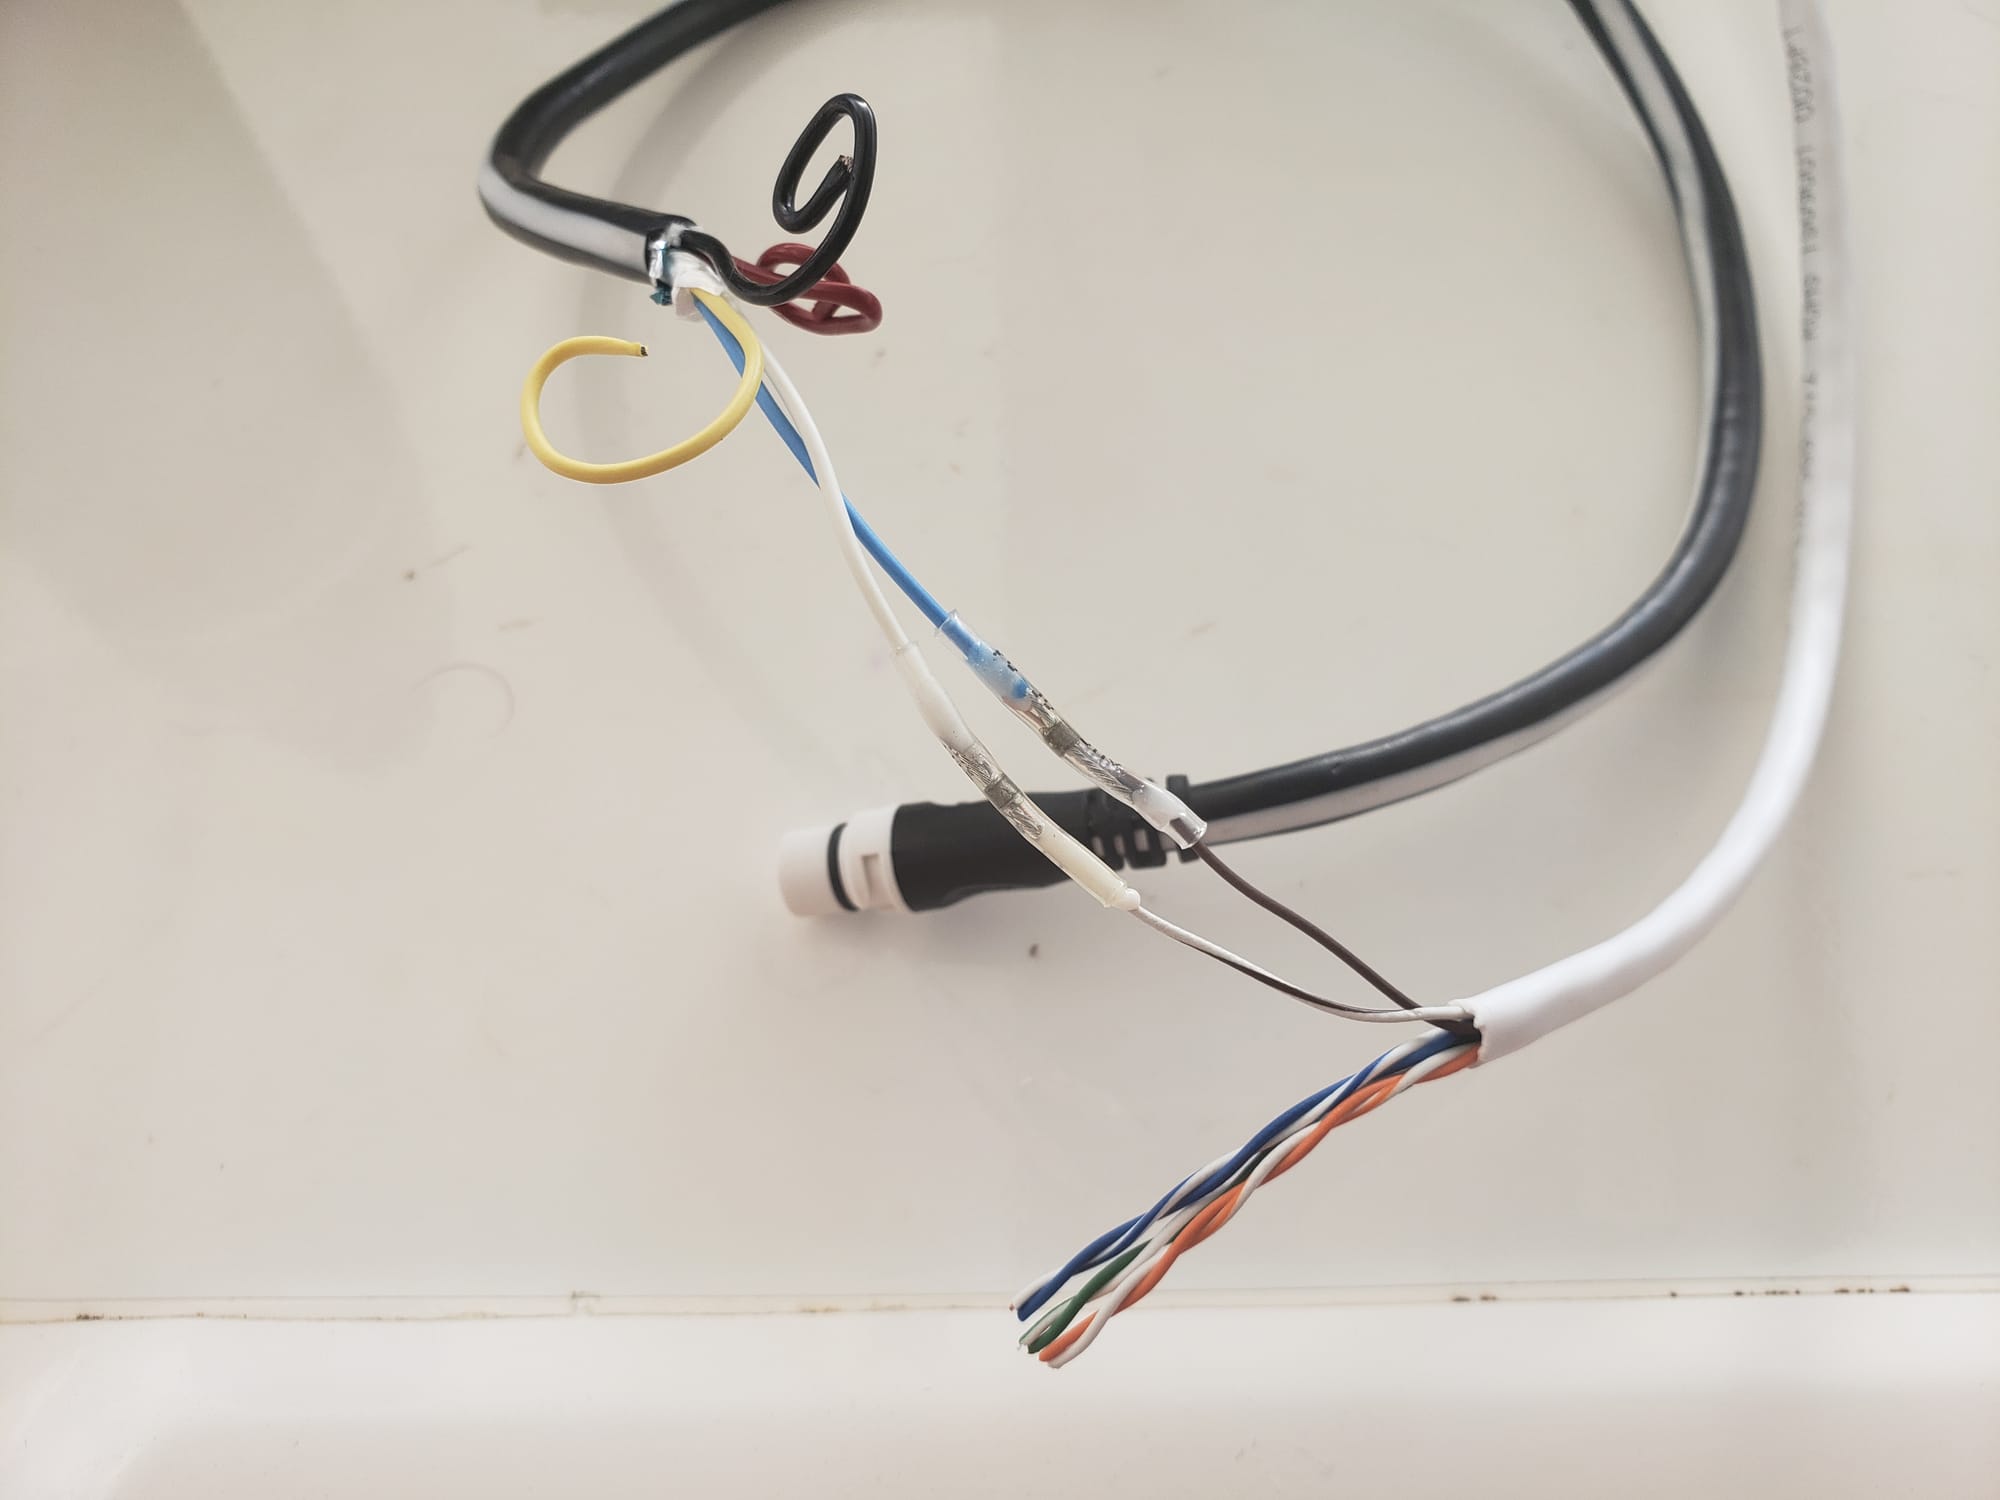

Overall, this took about 30 minutes of careful work, and cost WAY less than a VE.can to N2K adapter from Victron, plus an N2k to STng adapter from Raymarine. I just had to sacrifice a cat5e etheret cable and a STng spur cable.
Unfortunately, I neglected to take pictures of how I trimmed back the wires and tapered their lengths, wrapping them in electrical tape to provide insulation and prevent short circuits. You'll just have to use your imagination...
Once the cable was plugged in at both ends, I followed the directions on the Victron web site to enable N2K support on the Cerbo:

From here, I was able to verify that the Cerbo was sending lots of data about the power systems of the boat to the N2K network. (I have a Raspberry PI 4 connected to the STng network for this purpose.) Success!
Making the STng to Integrel N2K Adapter Cable
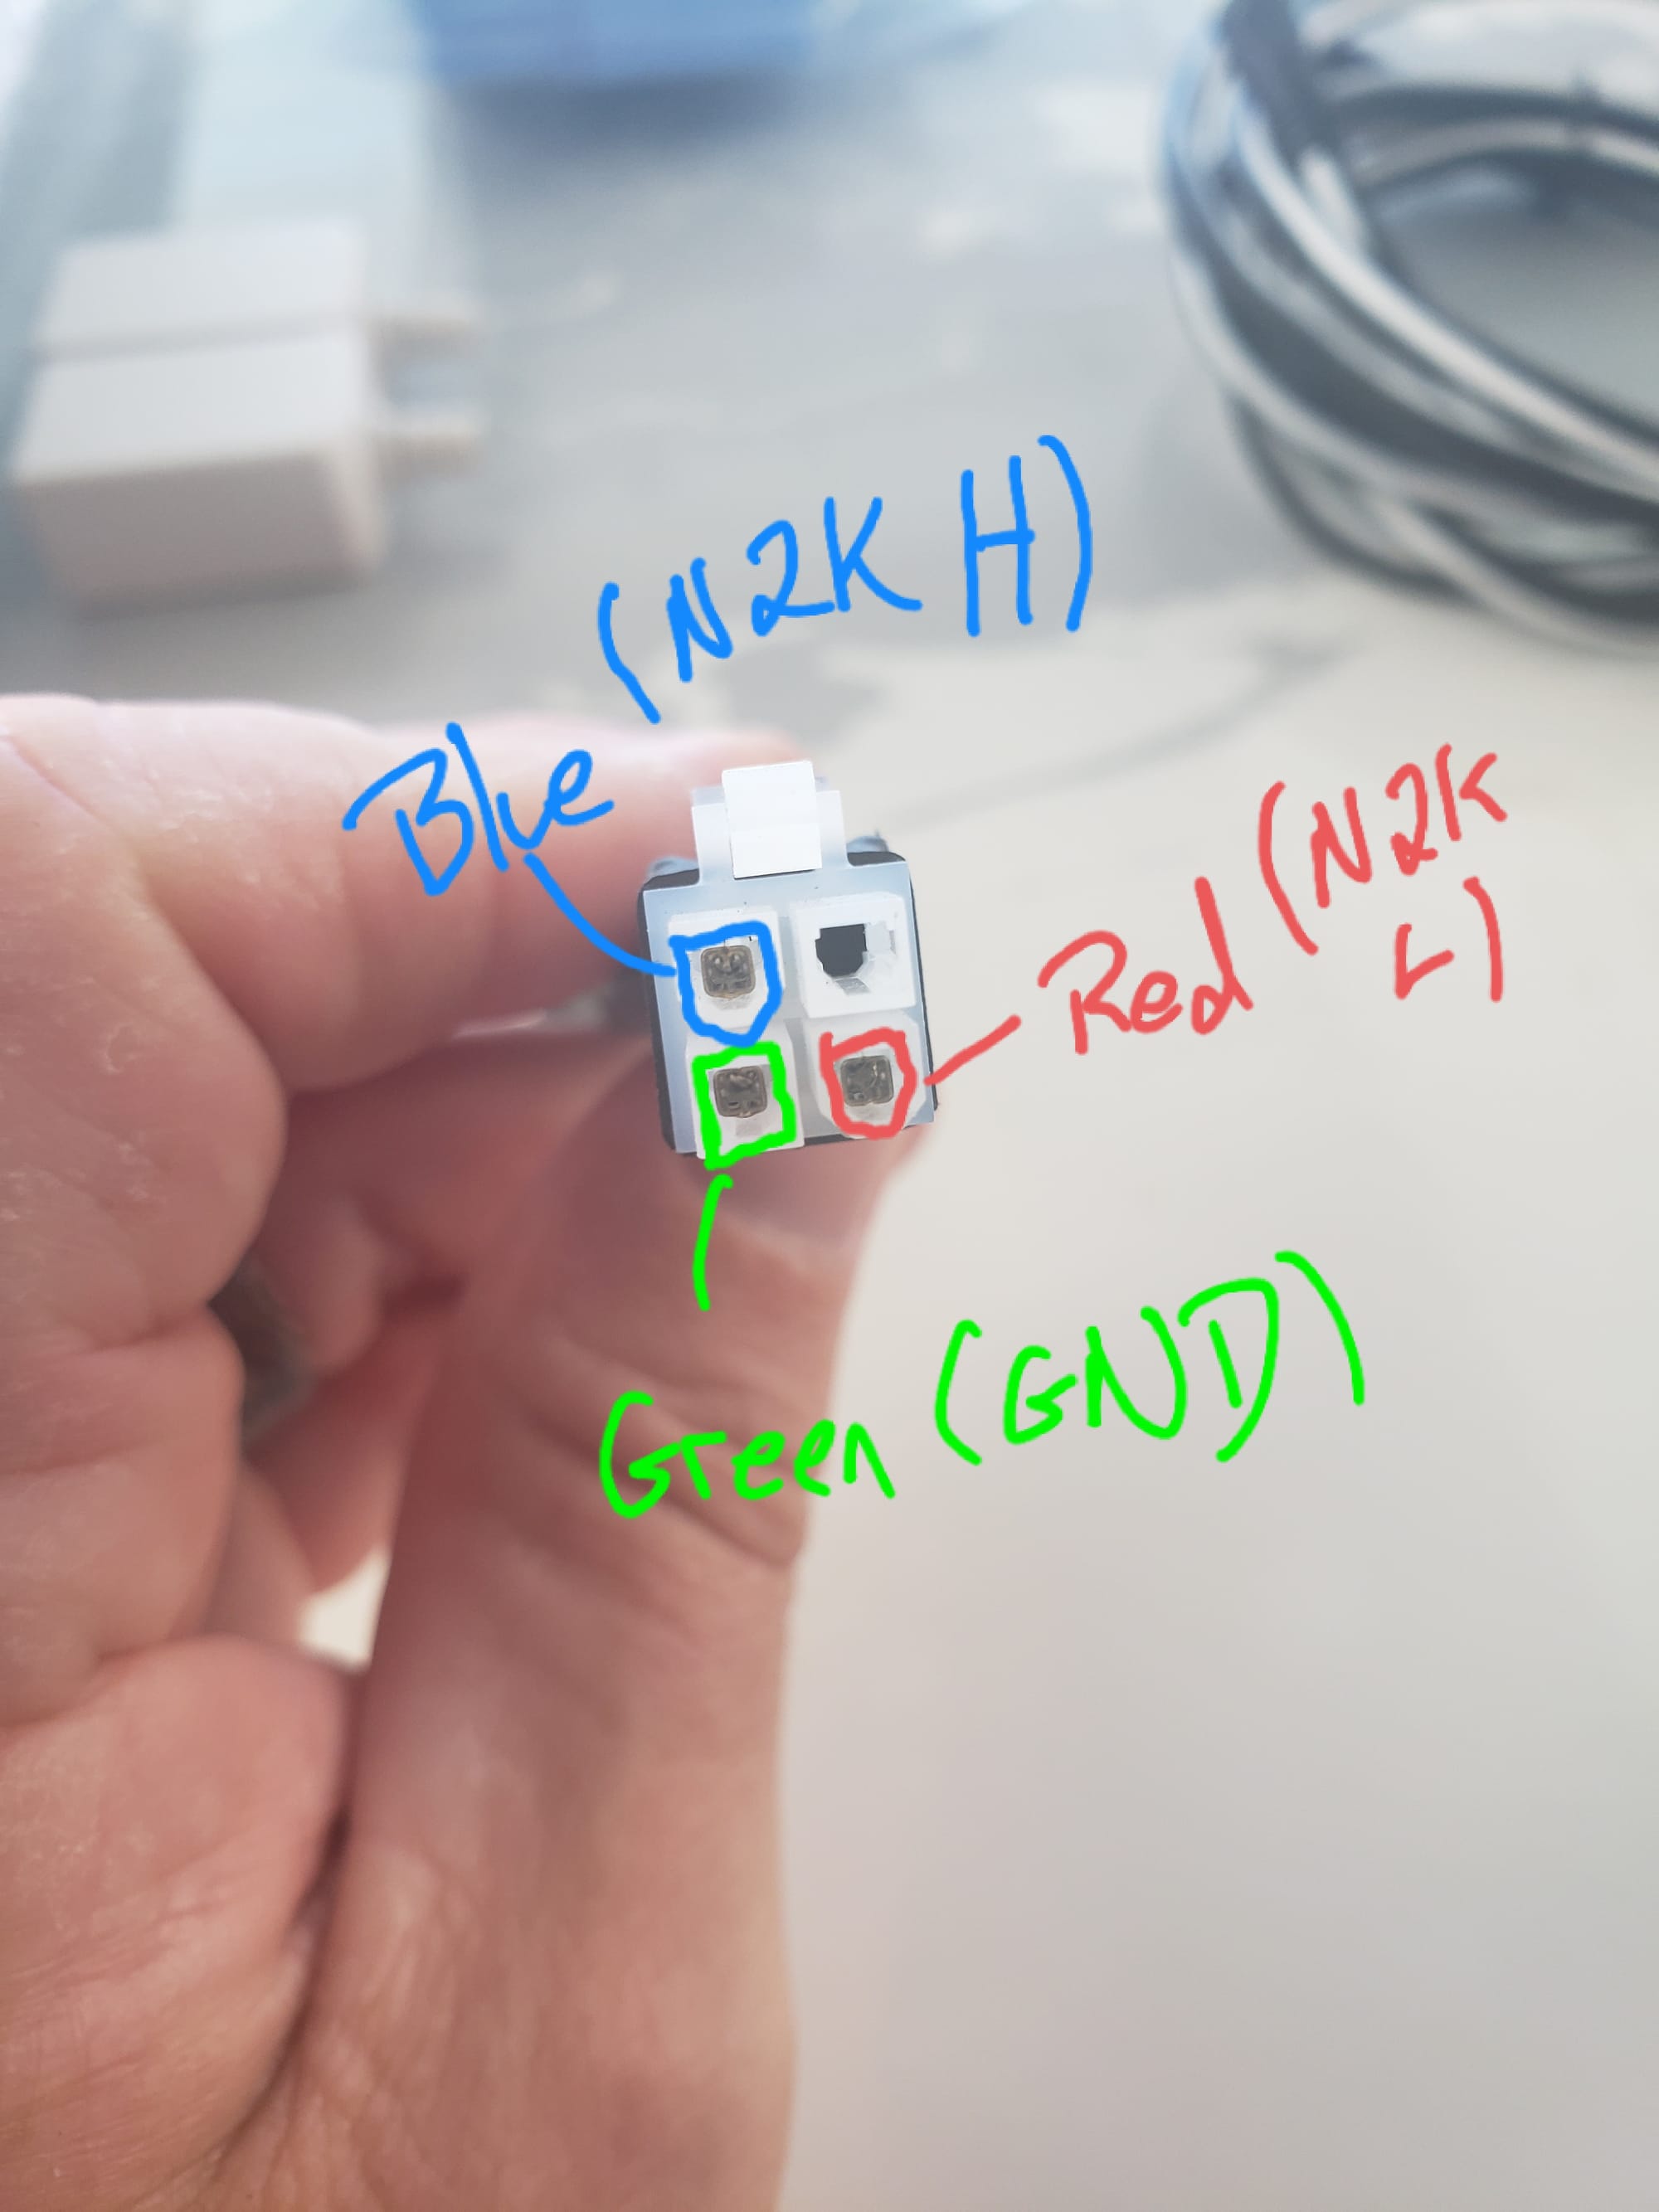
With the Victron side established on the N2K network, now it's time to get the Integrel Controllers connected. Integrel uses a 4-pin Molex connector on the controllers, and they only use 3 of the 4 pins (CAN-H, CAN-L, and ground).
Integrel provides an adapter cable that converts from Molex to RJ45, but this is very different from what Victron uses on their RJ45 interface.
It was easy to open the provided RJ45 socket and remove the 3 wires that we will need to connect to our STng cable.
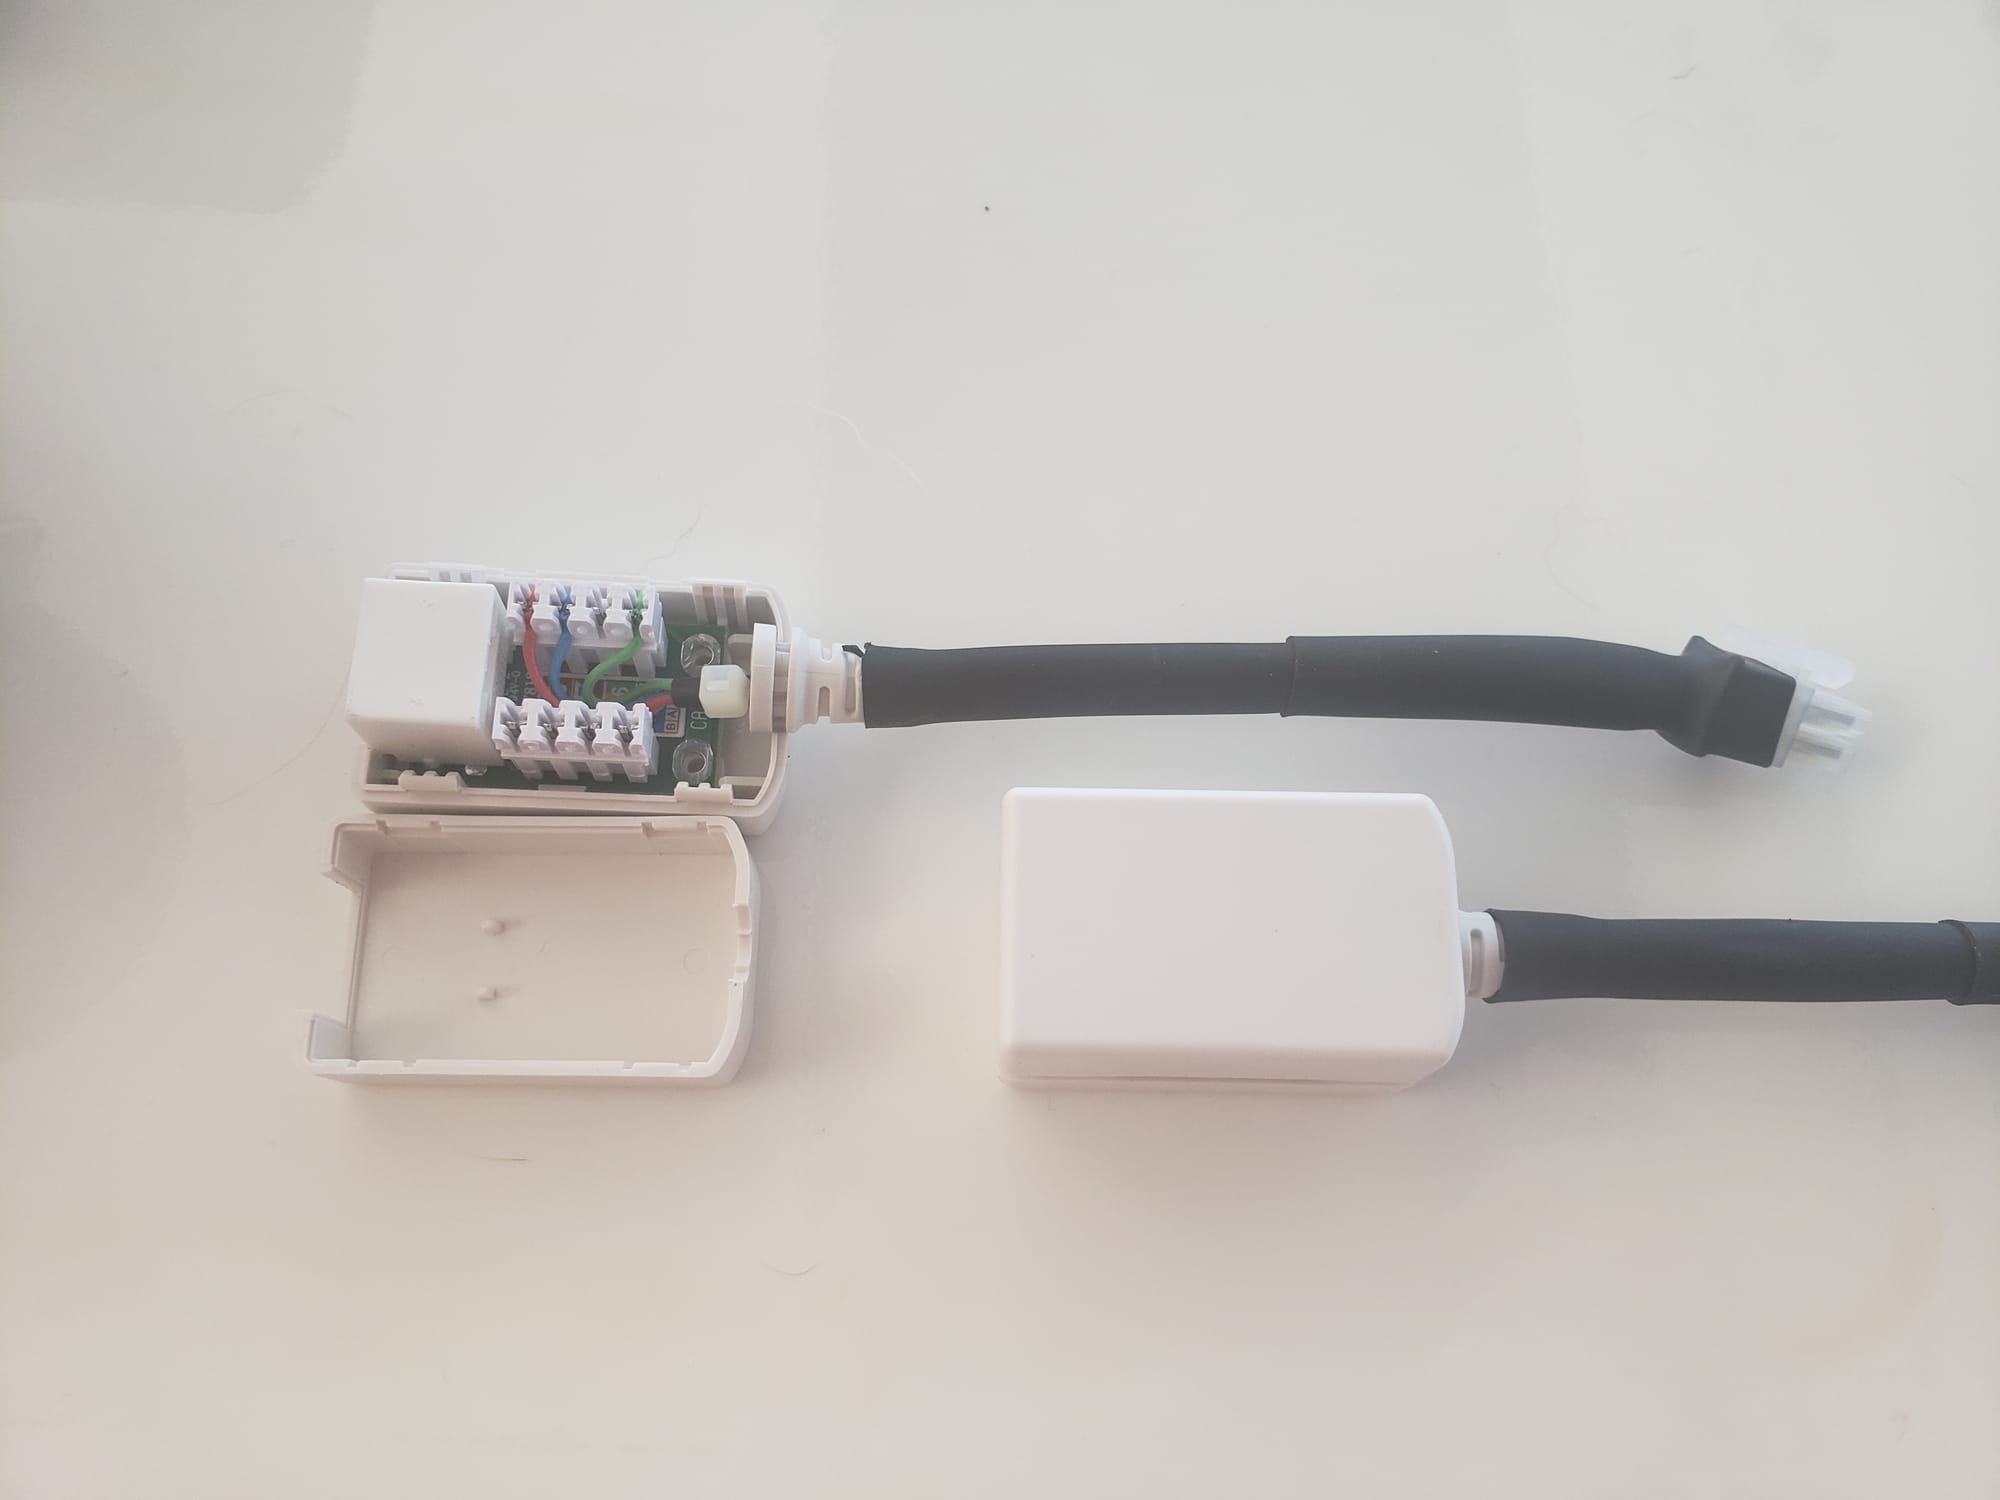
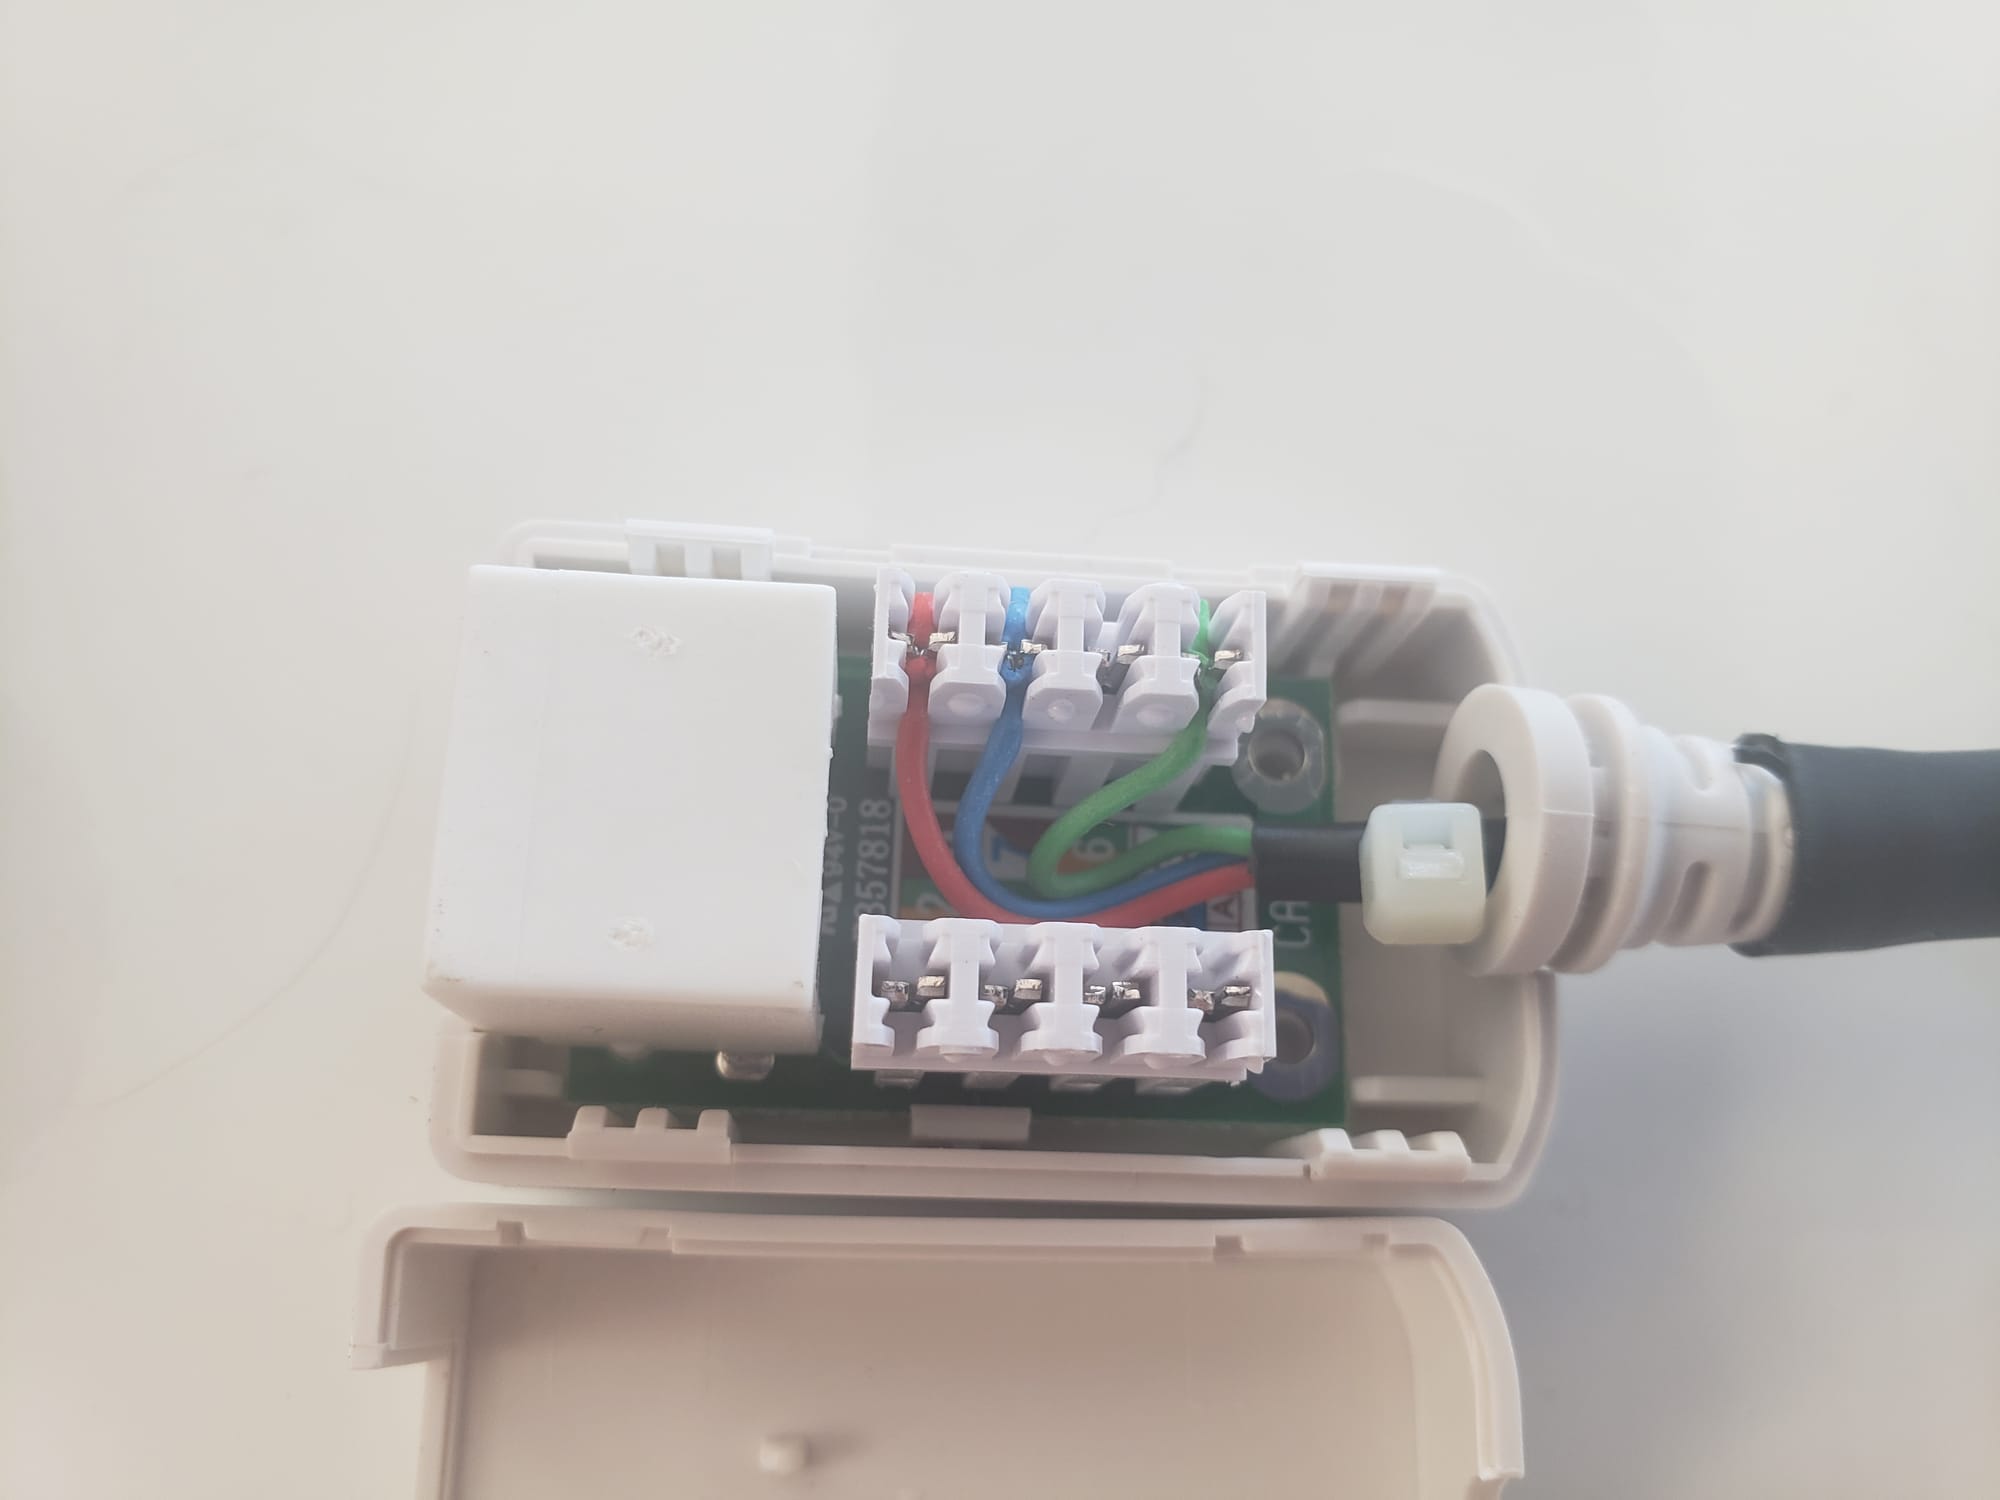
With these adapter cables made, the next step was to plug them in to the STng network, power things on, enable N2K output on the Integrel controllers, verify that it is getting data from the Victron Cerbo/BMS, and that it is sending data to the N2K network (again, using the RPi4 for this). Success!
Data available on N2K
Each controller sends 3 pieces of information to the N2K network: charging current (in amps), OEG temperature (in °c), and charging voltage.
From this, we can compute charging power (in watts), sum the total power produced over time, and the power produced for each day.
We can also compute power values for both OEGs combined.
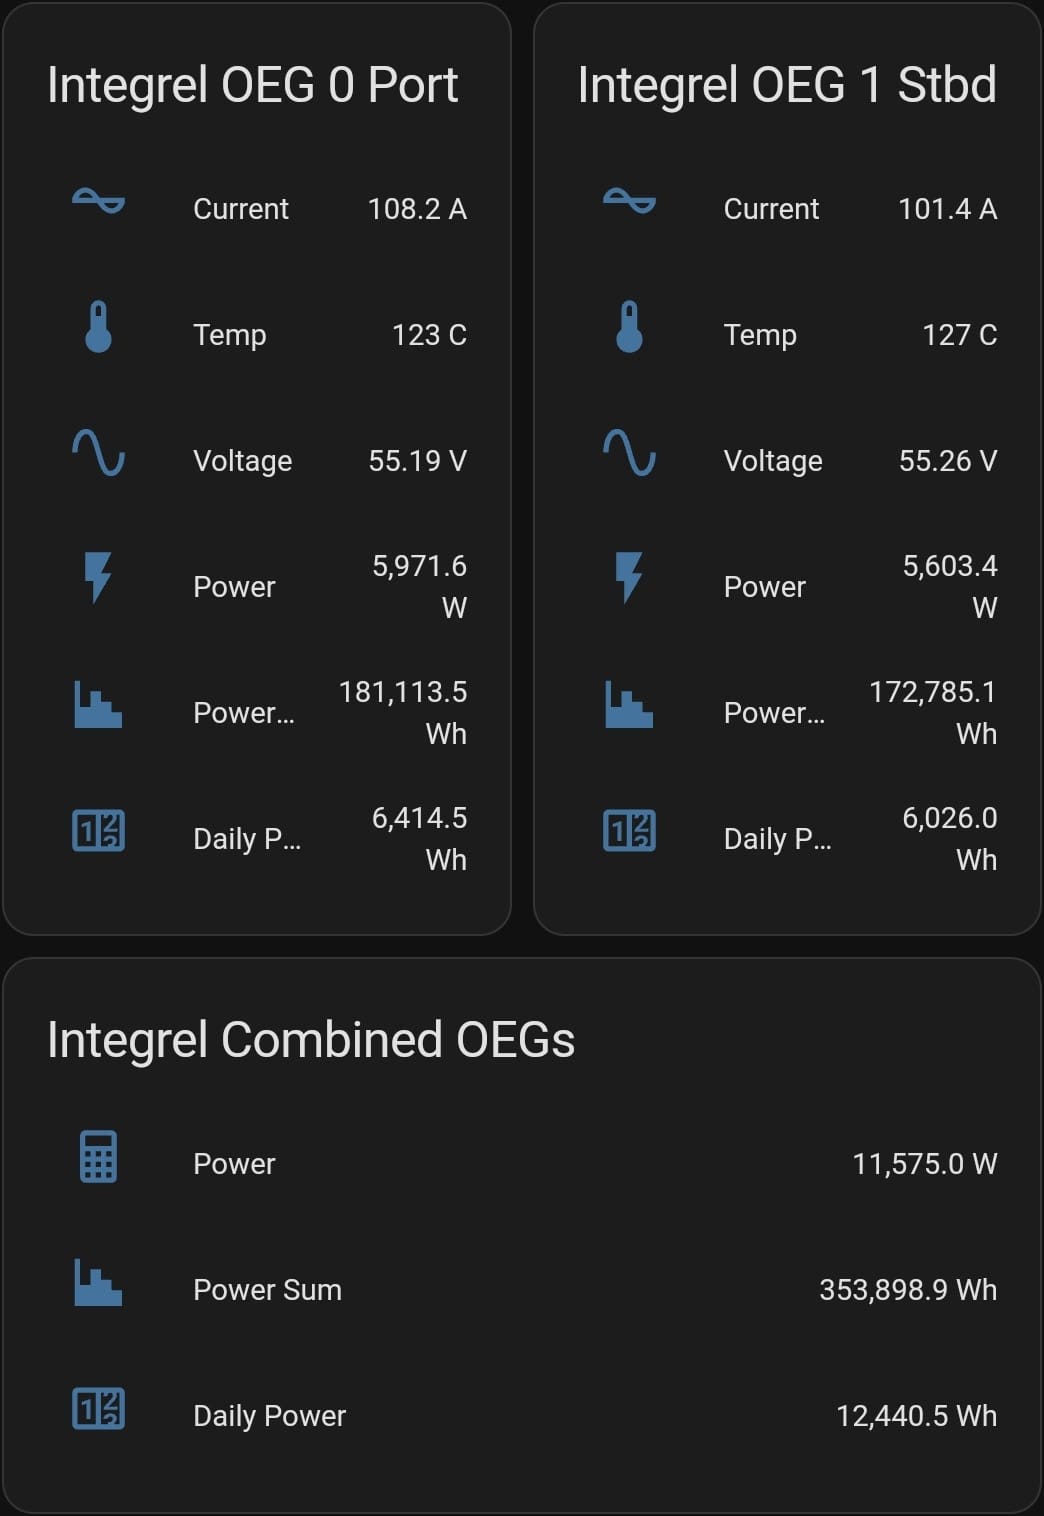
This data is super useful for monitoring system health, looking for problems, etc. If the temps get too high, this is a sign to look for air flow issues. If power production gets too low, it might be time to check for issues with the OEG drive belt.
Nice graphs and data! How did you get them?
Thanks! These are from Home Assistant (HA), a home automation system that we have running on the boat. I'm using 2 RPi4 boards to support portions of system:
- One is connected to the STng network, running signalk software to capture and format the data. It also runs node-red software which is able to take this data and send it to Home Assistant.
- The other RPi4 is running Home Assistant, which does real-time logging and display of the data, allowing me to set up automations to perform mundane but important tasks for me.
I leveraged the work of several other people to get this stuff installed and functional, then started modifying things to work well for us. If you are interested in more information, definitely check these resources out!

 BoatHackers
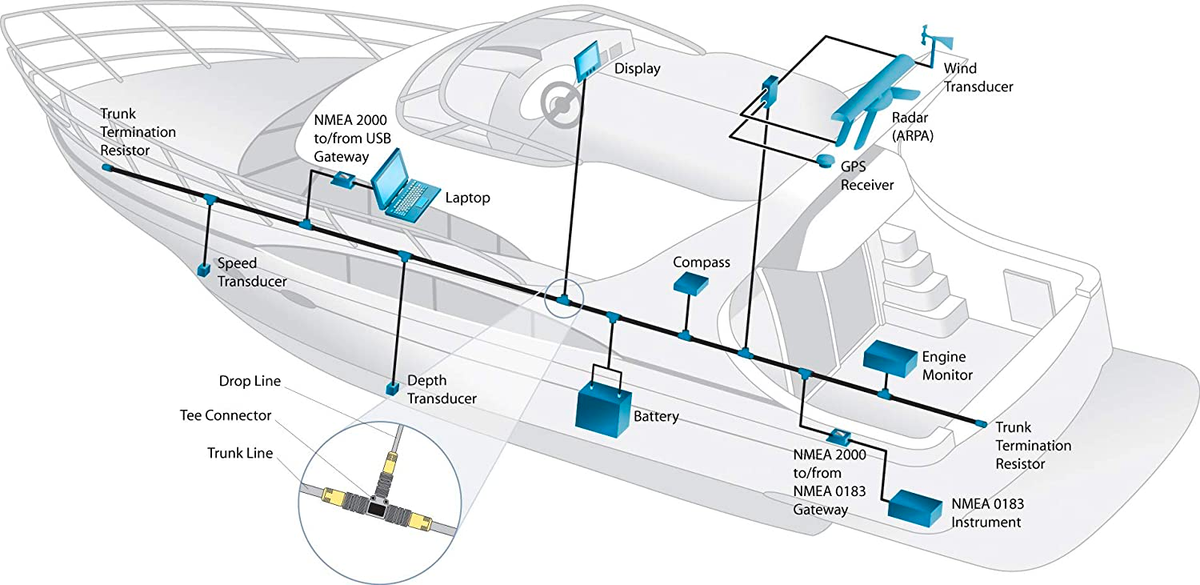
Our system set-up is a bit different from what Steve and John did, but the basic concept is the same. Many thanks to them for documenting and publishing their work, it made getting to this point so much easier!
I have a to-do item to document our specific setup for signalk and HA, but that's beyond the scope of this blog post...